This article turns a Raspberry Pi into a robot laboratory. One installer sets up a web server, the camera stack, OpenCV, the TensorFlow Lite runtime and Coral USB Accelerator support, then fetches the Earthrover source code and the machine learning models and puts them where the web server can reach them. When it finishes, you open a page in a browser and drive the robot.
Updated for the current Raspberry Pi OS. The earlier version of this article installed a script written for Raspberry Pi OS Buster. That script no longer works on current images — the camera stack, the GPIO tools and the TensorFlow runtime have all been replaced since it was written. Everything below has been tested on Raspberry Pi OS 13 (Trixie) on a Raspberry Pi 3A+ and a Raspberry Pi 4 Model B, installed from a fresh card.
The code is on GitHub as robotics-level-4. That repository is the authoritative reference for what the installer does and how the software is laid out; this article is the walkthrough.
Step 1: Prepare a micro SD card with Raspberry Pi OS
Use Raspberry Pi Imager to write Raspberry Pi OS (64-bit) to the card. Either current release works — OS 12 (Bookworm) or OS 13 (Trixie). The installer checks the version and stops on anything older, because the packages it needs do not exist there.
Before Imager writes the card, open its customisation settings and fill in your Wi-Fi network, a hostname, and enable SSH. This matters more than it used to: the old trick of dropping a wpa_supplicant.conf file onto the boot partition stopped working when Raspberry Pi OS moved to NetworkManager, and Imager is now the way to set up a board you intend to run without a monitor and keyboard.
Step 2: Download the installer
Boot the Pi, connect it to your network, and open a terminal. Fetch the script:
curl -fsSL https://raw.githubusercontent.com/jiteshsaini/robotics-level-4/main/earthrover/setup_level4.sh -o setup_level4.sh
Downloading the file first, rather than piping it straight into a shell, means you can read it before you run it. It is worth a minute of your time — it is your Pi, and this script installs a lot on it.
Step 3: Run the installer
bash setup_level4.sh
Not with sudo. The script calls sudo itself where it needs to, and it will stop and tell you so if you try. Run it as the ordinary user you logged in as.
Allow an hour or more for a first run. The script brings the whole OS up to date before it installs the camera and vision packages, so that they are not built against an older kernel. Nothing reboots by itself; if a restart is needed, the script says so at the end.
You do not need to enable the camera separately. The installer writes camera_auto_detect=1 to the boot configuration for you — the old raspi-config step from previous versions of this article is gone.
Step 4: Open the control panel
When the script finishes it prints the address to open. From any laptop or phone on the same network, in a browser:
http://<your-pi-ip>/earthrover/
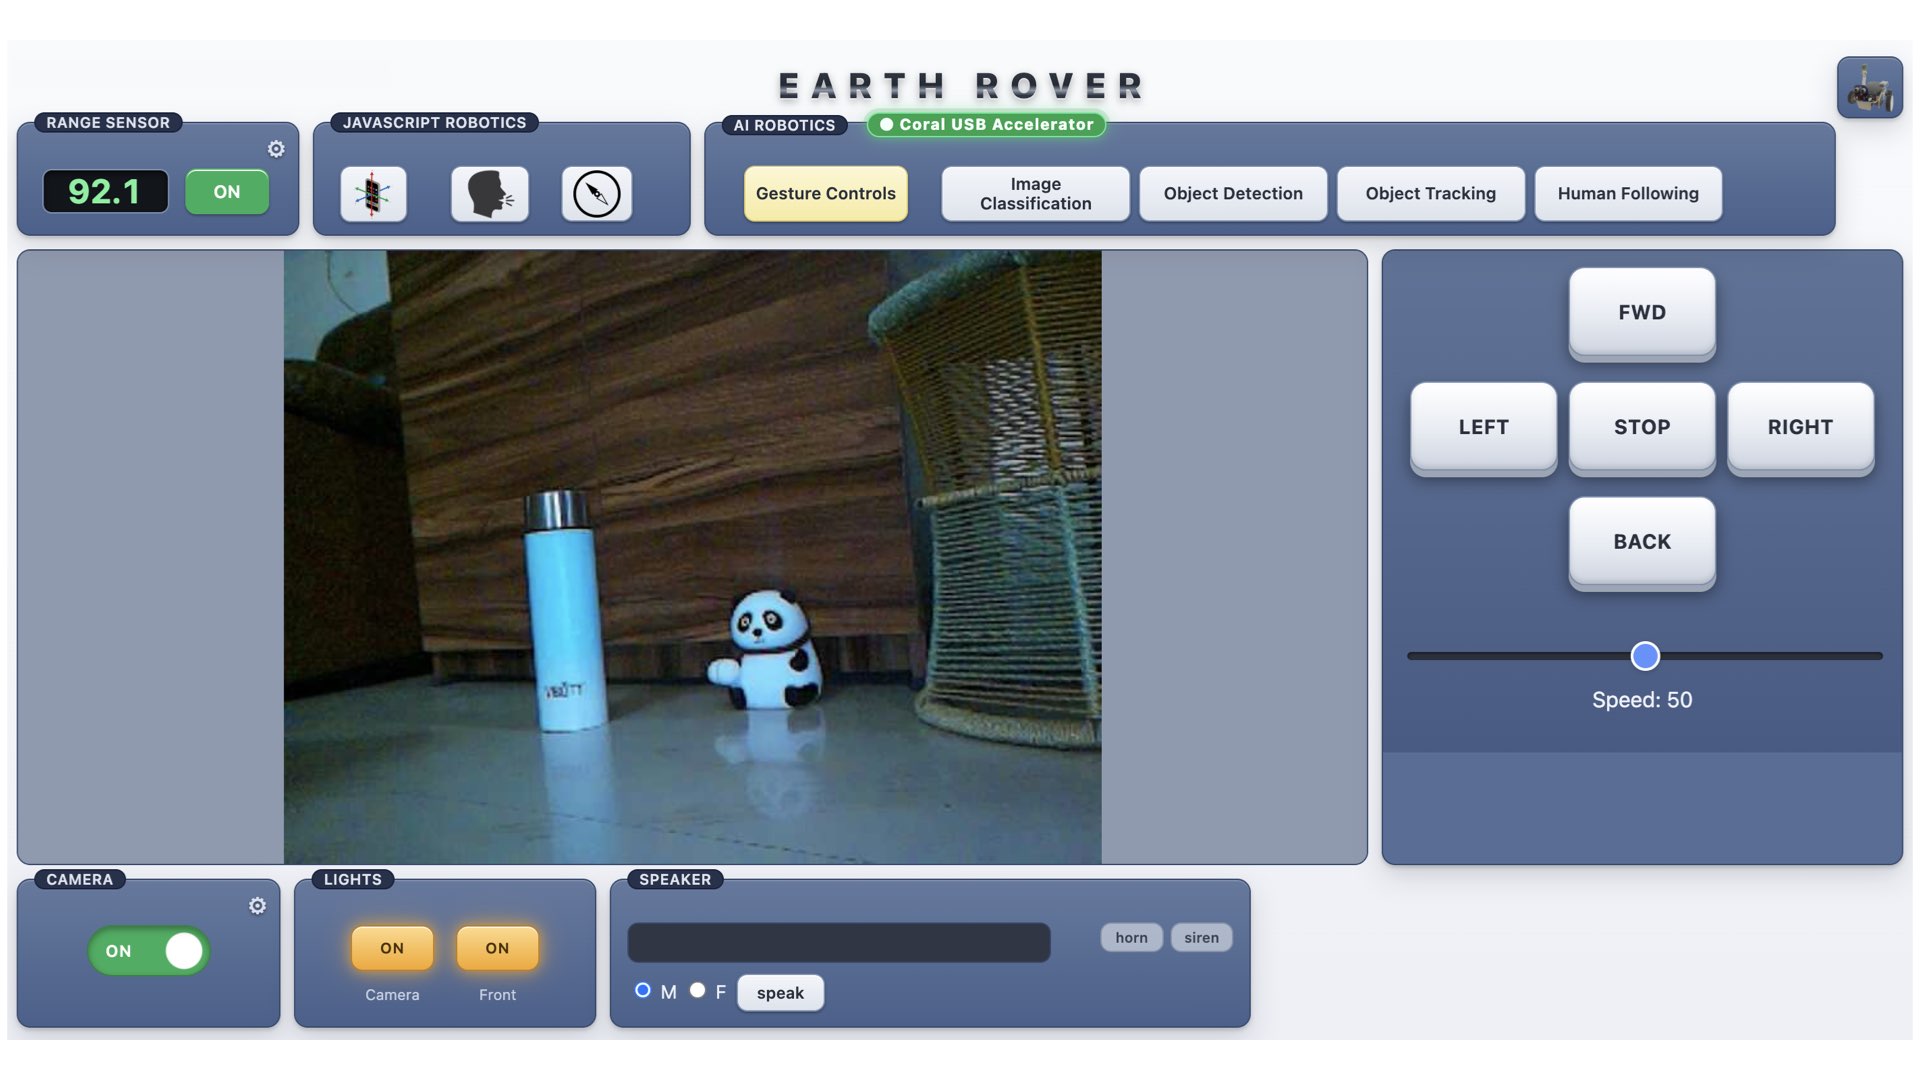
One page drives everything. The five machine learning projects run along the top, the live camera feed fills the middle, and the direction pad and speed sit on the right, with the distance reading, the lights and the speaker around the edges. Reload the page and the controls come back as you left them — they report what the robot is actually doing, rather than what was last clicked.
The green badge beside AI ROBOTICS is worth pointing out. It says which backend the models will use: Coral USB Accelerator when one is plugged in, CPU when it is not. The accelerator is optional — the models run either way, and it is detected at runtime, so there is nothing to configure and no separate build to install. With one plugged in the models run roughly ten times faster. The badge asks the same code the robot does, so the panel and the rover cannot disagree about it.
What the installer does
In order:
- Brings the OS fully up to date
- Installs Apache, PHP, the GPIO library, the camera stack, and the speech and audio tools
- Installs the TensorFlow Lite runtime (
ai-edge-litert) and OpenCV - Fetches the code and the machine learning models into
/var/www/html - Enables the camera interface
- Generates a self-signed certificate and switches on https, which the phone-sensor pages require
- Installs Coral USB Accelerator support — harmless if you do not have one
- Gives the web server the group memberships and file ownership it needs
An existing installation is moved aside rather than overwritten, so running the script again on a Pi that already has it is safe.
Two of those deserve a note, because they are the things that changed since the original article. The GPIO library is rpi-lgpio rather than the older RPi.GPIO, which does not work on a Raspberry Pi 5. And raspi-gpio, the command line tool a lot of older tutorials still reach for, was removed from Raspberry Pi OS — pinctrl replaces it.
If your board has 512 MB of memory
On a Raspberry Pi 3A+, the desktop is the difference between a detector that runs and one that lives in swap — about 0.1 frames per second against 10. If that is your board, turn the desktop off:
sudo systemctl set-default multi-user.target
sudo systemctl disable lightdm
sudo systemctl disable --now wayvnc
sudo reboot
The installer points this out when it finds such a board, but does not do it for you, because it also closes VNC. On a Pi 4 or 5 there is no need.
When something does not work
The script can check its own installation without changing anything, and without asking for a password:
bash setup_level4.sh --verify
That is the first thing to reach for. Two other options exist: --fix-perms re-applies web-root ownership without reinstalling, and --help prints the notes at the top of the script.
If a machine learning feature misbehaves once the panel is up, the worker logs are in the logs/ folder inside the installed code.
Starting smaller
This installs the complete robot. If you would rather build up to it, the earlier levels are separate repositories that each add one layer: level 1 for motors and a web control panel, level 2 adds the camera, level 3 adds the phone sensors and voice control, and level 4 — this one — adds machine learning on the robot itself.
All you need is a Raspberry Pi and a camera to get started. Other hardware can be added subsequently.
While building this robot, i realised that it is not enough to just share the source code. The important part is the environment in which this source code runs. Setting up the required environment can be a challenging task if you are just starting. So, i created this bash script, which sequentially installs everything that is required to run the software of Earthrover on your Raspberry Pi. Follow the above steps as described and you can replicate my work on your device.
All the best.
Hello Sir,
Can i get the github code link for the above GUI and ML part,please.
I need to tweek it a little for my project which is similar
Thank you
https://github.com/jiteshsaini/robotics-level-4
Thank you
Amazing project. Thank you for the detailed writeup and excellent explanations of things. I’m getting a ssl error. Any insight how to fix the certificate issue?
Hello Sir
How do I replicate this project, but with my pretrained model from google teachable machine?
Hello Sir,
I want to replicate only the human following logic of the earthrover. Could you please tell me the steps to implementing the code and customizing it onto the raspberry pi. Can i use usb camera instead of the picamera. Please tell me the necessary changes.
Just download and run the bash script as described in this article. Yes you can use the USB Camera, no changes required. The camera is accessed through OpenCV.. cap = cv2.VideoCapture(0).. just try 1 or 0 in this line.. it should work with USB camera out of the box
Any chance on you making video on how is this done or lil written gude
How can I customize the modelnet ssd model …i want to detect unique tag and the follow it so how can i include tht tag in the model
Hi Ajit, there is a technique called transfer learning to achieve what you want. Check out this video also https://youtu.be/-ZyFYniGUsw
Hello sir i was able to replicate the project but the frames per second is too slow…so Is it possible to get the coral usb accelerator in india(goa) an how much will be its cost. In tht human following code how can we also detecte the colour (HSV) so tht it follows only person with tht particular colour
I got the coral shipped from US.. You can check the options on coral.ai website. Detection of color can be done through image processing techniques. I hope OpenCV should have a method for that. Let me know if you succeed
hi this is a useful tutorial, but i wasnt able to use the bash script because im running VERSION=”11 (bullseye)” ,aarch64, i already have open cv and tensorflow lite libraries when i tried to use the command sudo sh auto_install.sh the folowing desplayed
Raspbian Version: 11 This OS not supported. Earthrover’s software works with Raspberry Pi OS(Legacy), also known as ‘Buster’ and earlier versions. Prepare a micro sd card with ‘Buster’ and try again.
is there a way i can use this os and use your bash script without running Raspberry Pi OS(Legacy
i would be very greatful if u could help me sort this problem.
Hello, i enjoyed the project and i am trying to learn from it as much as possible. is there a way to run the program without running the bash script everytime ?
Bash script is used only to install the software once. You don’t have to run it again unless you want to prepare a new sd card. You can access the web control panel by typing the ip address of your pi..
very nice work, appreciable project!?
You are the best! Thank you very much for all your work, and thank you for sharing!
Thanks Julio ?