Compass Robot - Javascript Mobile Sensor Control
This Compass Robot is built using Raspberry Pi 3A+ and a smart phone. The Raspberry Pi runs a webserver that hosts the application created for this project.

Smart phones are loaded with all sorts of sensors such as camera, microphone, GPS, compass, accelerometer and many more. One way to access these sensors is to write an application using SDKs of Android or IOS and using the APIs provided by them. Don’t worry if you have no expertise in making apps using these SDKs because there exists another interesting and much simpler way to access these sensors.
Using any modern browser, you can simply pull the web page embedded with necessary Javascript code to access your mobile phone's sensor. This method does not require installation of any application on the device. With the latest HTML5 and Javascript APIs we can achieve the hardware control of a device and write apps that can give traditional apps run for their money.
The mobile phone computes the orientation angles by using its gyroscope sensor in combination with the accelerometer. Using these two hardware sensors, the system provides data for the orientation angles. All this serious stuff is happening inside your device. The beauty of Javascript APIs is that you can scoop the result of this hardwork by a few lines of code. Read the official document of these APIs here.
In this Compass Robot project , I will demonstrate how you can use a mobile phone as a compass and use it to control the robot’s direction precisely. You can have a feel of the Web Apps developed for this project using your mobile phones. Try using this simulator.
The picture below shows the interaction between the Raspberry Pi and smartphone to exchange the desired information
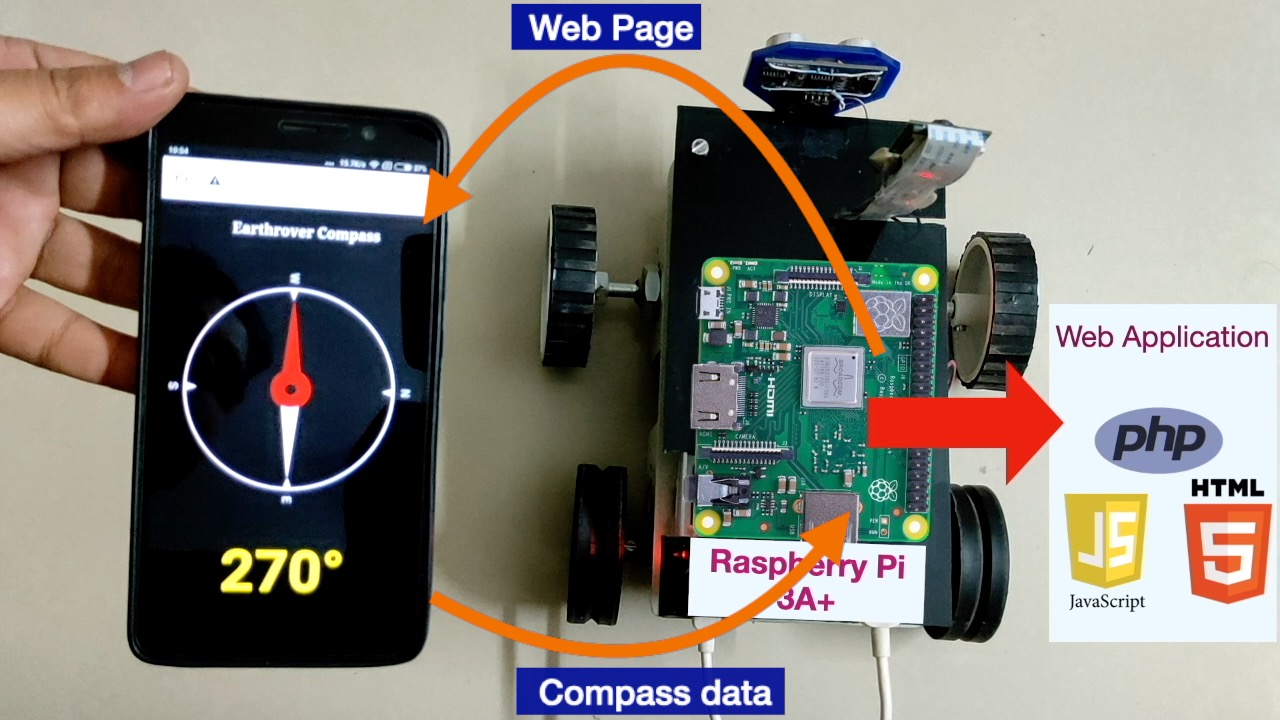
The web page seen on the mobile phone is pulled from the Raspberry Pi. The webpage has the javascript code embedded in it to access the smart phone’s compass value and send it back to the raspberry pi. Just remember that any javascript code that needs to access hardware of your device must come from a server with 'https' enabled. So you need to configure the webserver running in raspberry Pi to provide 'https' access.
The "Compass" of the Compass Robot
Lets see the code of the web page that turns a smartphone into a compass.
The file ‘robot_compass.html’ is responsible for generation of UI of compass. The UI of this application is derived from a Github repository by Chris Haynes. At the bottom of this HTML file you can see a javascript file linked to it.
<script src="js/app3.js"></script>The file 'app3.js' is responsible for capturing the compass data of mobile phone and transmitting it to the server. The file begins with creating following event listener:-
window.addEventListener("deviceorientation", onHeadingChange);After registering to the event listener, the javascript function 'onHeadingChange' defined inside the listener gets called periodically with updated orientation data.
function onHeadingChange(event) {
   var orientation = event.alpha;

  if (typeof orientation !== "undefined" && orientation !== null) {
      positionCurrent = orientation;

      var phase = positionCurrent < 0 ? 360 + positionCurrent : positionCurrent;
      var heading = 360 - phase | 0;


      get_heading(heading);

      // apply rotation to compass rose
      if (typeof rose.style.transform !== "undefined") {
        rose.style.transform = "rotateZ(" + positionCurrent + "deg)";
      } else if (typeof rose.style.webkitTransform !== "undefined") {
        rose.style.webkitTransform = "rotateZ(" + positionCurrent + "deg)";
      }
  }
  else {
      alert("No Orientation");
  }
}
The 'alpha' event corresponds to motion of the device around the z axis, represented in degrees with value ranging from 0 to 360. the code above calculates how much the device is rotated and calculates the heading. This heading value is passed to a function 'get_heading()' for further processing. The function 'get_heading()' is defined in the main file i.e. 'robot_compass.html'.
function get_heading(heading){
	document.getElementById("disp").innerHTML = heading + "°";
	$.post("ajax_heading.php",{heading:heading});
}
The above function simply displays the heading value on the page and then passes this value to a PHP file in server 'ajax_heading.php' via background ajax call as a POST parameter. This file receives this heading value and writes to a text file 'heading.txt' in the server as show below.
<?php
//this file receives the heading information from client (mobile with control web app) and writes it on txt file
$h=$_POST["heading"];

$myFile = "heading.txt";
$fh = fopen($myFile, 'w') or die("can't open file");
fwrite($fh,$h);
fclose($fh);

?>
So, basically whenever the robot moves, the heading value on the smart phone's web page is updated by javascript code and sent to the server, where it gets overwritten on the text file. This way the server i.e. the robot is aware of the change in its direction.
Control Applications for Compass Robot
Control App 1: Mobile Phone Compass
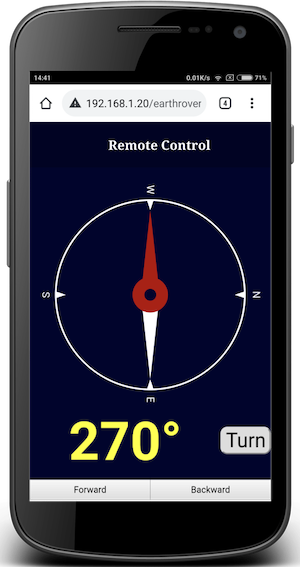
The code for this application is present in 'control1.html' file. It is mostly same as the 'robot_compass.html' file w.r.t the UI generation. However, the heading value in this app is passed to a PHP file 'turn_degrees.php' in the server on press of the 'Turn' button as shown below.
function send_data(){
	var hh = document.getElementById("data").innerHTML;

       //hide the Turn button
	document.getElementById("btn_submit").style.display = "none";
       //show the gif file with waiting animation
	document.getElementById("gif").style.display = "block";

	$.post("/earthrover/compass/turn_degrees.php",
	    {
             heading_cmd:hh
            },
            function(data,status){

            //show the Turn button
	     document.getElementById("btn_submit").style.display = "block";
            //hide the gif waiting animation
	     document.getElementById("gif").style.display = "none";

            });
}
The function 'send_data()' is called when the the 'Turn' button is pressed. It picks up the heading value from an HTML element with id 'data' and passes this value to the remote PHP file as an angle command. The code inside 'function(data,status)' is executed when the remote PHP file returns any value.
Control App 2: The Round Slider
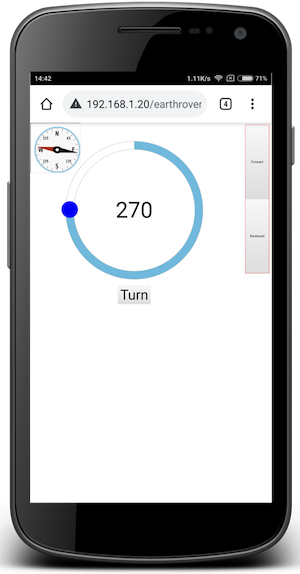
The code for this application is present in 'control2.html' file. This file makes use of a free jQuery plugin called Round Slider to generate the heading value. Detailed documentation with multiple deployment examples of this Round Slider is available at this link. I have customised the Round Slider for my application. Similar to the Control app 1, this app also sends the heading value to the remote PHP file 'turn_degrees.php' as an angle command.
The Compass Robot Movement
The turning motion of the robot is implemented in PHP file 'turn_degrees.php'. This file makes use of own heading data (available through text file 'heading.txt') and angle command from client (Control app 1 or Control app 2) to turn the robot towards commanded angle. The file begins with receiving the angle value from the client. it passes this value to the function 'turn()' which does the whole processing of moving the robot.
include_once '../vars.php'; //implements GPIO controls for robot movement

$deg=$_POST["heading_cmd"]; //receive the command angle

global $course;
$course=get_current_heading(); //get the current angle of the robot

turn($deg); //move the robot to achieve commanded angle

echo"done"; //send the feedback to the client when the motion is over.
Once the command angle is passed to the 'turn()' function, it continues to move the robot until the robot heading is equal to the command angle as described in the code below.
function turn($h_final){
	global $course;
	$h=get_current_heading(); //read the txt file to get current heading
	$h_current=intval($h);

	$k=0;

       //perform the tasks until current heading is same as command angle
	while($h_current != $h_final){

		$arr=get_dir_deg($h_current,$h_final); //get the direction to turn and magnitude of the difference between current heading and commanded angle
		$dir=$arr[0];
		$degrees=$arr[1];
		$accuracy_factor=get_accuracy_factor($degrees);//based on the angle difference get a number.

		move($dir); //start the motion
		$delay=$degrees*$accuracy_factor; //turning time  (milliseconds of motion. lesser the degrees, lesser the time)
		//echo "direction: $dir , Angle difference: $degrees ,delay= $delay<br>";

		usleep($delay * 1);//continue the motion for this duration
		move('s'); // stop the motion
		usleep(300*1000); //no motion for certain duration

		$h=get_current_heading(); //get own heading again by reading the txt file.
		$h_current=intval($h);

		$k=$k+1;

	}
	$course=$h_current;
	//echo"<h2>settled in attempts: $k, new course: $course</h2>";
	//set_speed('50');
}
With every iteration of the while loop, the compass robot moves closer to the commanded angle. Depending upon the surface / pwm voltage applied to the motors, the no of iterations can vary. But finally, it will make the robot converge to the desired direction.
The article provided an example how Javascript can be used for hardware control. You can download the code from the GitHub link provided at the top of the page and use the circuit diagram as mentioned in this article to build this compass robot.
Comments