This article describes making of a voice controlled robot using Raspberry Pi. The project involves creation of a Web Application that resides in a webserver running on Raspberry Pi. Try this live demo of the web application to understand how it works.
GUI of the application is written in HTML & Javascript and backend processing (including hardware controls) is achieved through PHP.
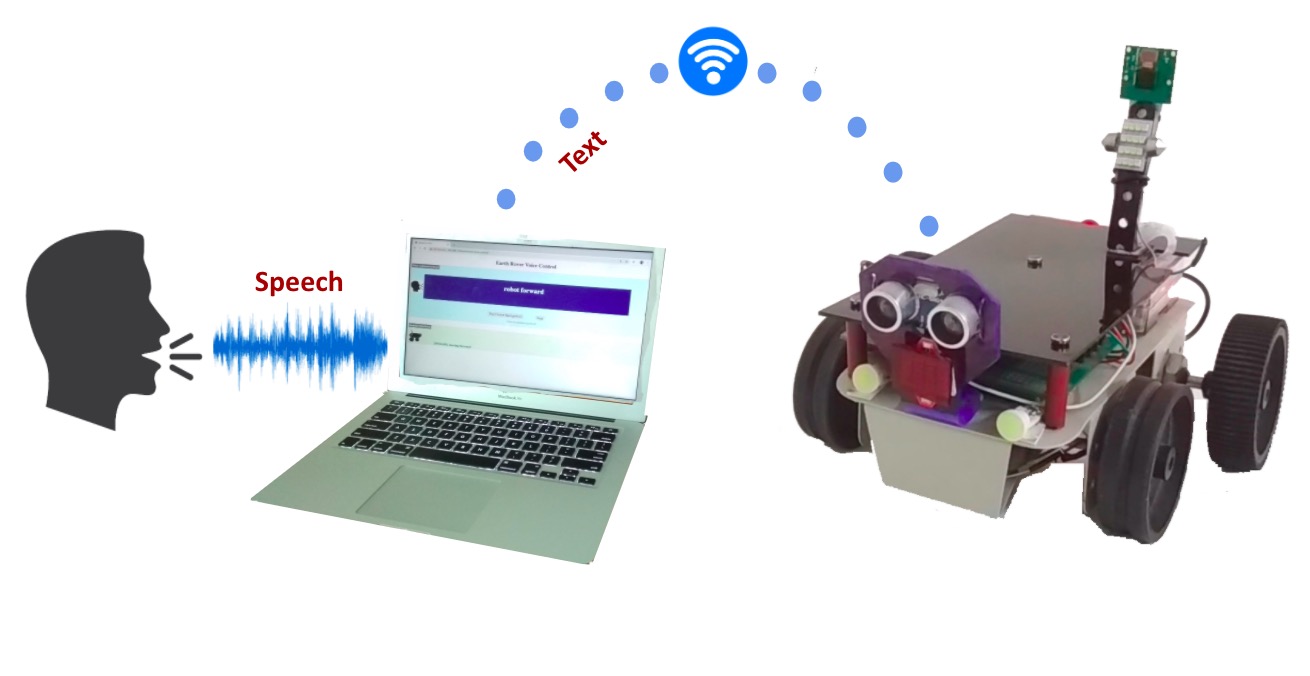
The voice commands are converted to text using a Javascript API called “Web Speech API” running on a browser. The converted text is sent to the server (running on robot) for further processing to achieve robotic controls.
Any spoken word / phrase (Voice Commands) are converted to text and passed to the robot. However, valid voice commands require the phrase to begin with the word ‘robot’ followed by the action that needs to be performed. A list of valid commands is given below:-
– robot forward
– robot backward
– robot stop
– robot lights on
– robot lights off
– robot right
– robot left
The article covers following aspects:-
- What is Web Speech API ?
- Web Application Components
- Code walk through
Let’s build it.
What is Web Speech API ?
Web Speech API is a Javascript API which allows you to do following tasks through a web browser:-
1. Speech Recognition (Speech to Text)
2. Speech Synthesis (Text to Speech)
A complete guide to use this API is available at this link
https://developer.mozilla.org/en-US/docs/Web/API/Web_Speech_API
The example demo used in the official website of Web Speech API can be accessed though this link:-
https://mdn.github.io/web-speech-api/speech-color-changer/
Also try this example:-
https://www.google.com/intl/en/chrome/demos/speech.html
An overview of the API is show below.
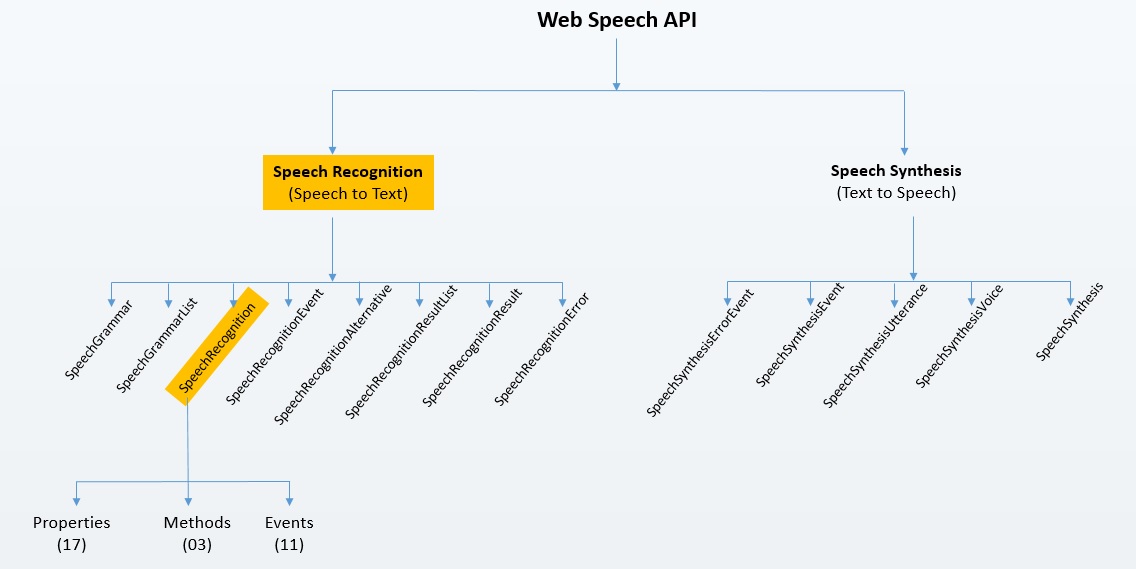
The part of the API which is relevant to this project is highlighted in yellow color. As shown in the picture above, the Speech Recognition module of the API has multiple interfaces. The ‘SpeechRecognition’ interface is implemented to make voice controlled robot. Rest of them are not used.
The ‘SpeechRecognition’ interface of the API is responsible for the voice recognition service and converts the voice commands to readable text. This interface has 03 methods and multiple properties (with associated events). Some of these methods and properties are used in creating the application for voice controlled robot.
Web Application Components for Voice Controlled robot
The application performs the task of capturing voice input from the user, converting the voice to text, sending the text to server and using the information in text to control the robot. These tasks are implemented in following files:-
| Task | File Name |
| Creation of GUI | index.html |
| Voice recognition, converting speech to text, sending the converted text to server | script.js |
| Processing the text to identify valid commands, controlling the GPIO pins of Raspberry Pi to actuate robotic motion | action.php |
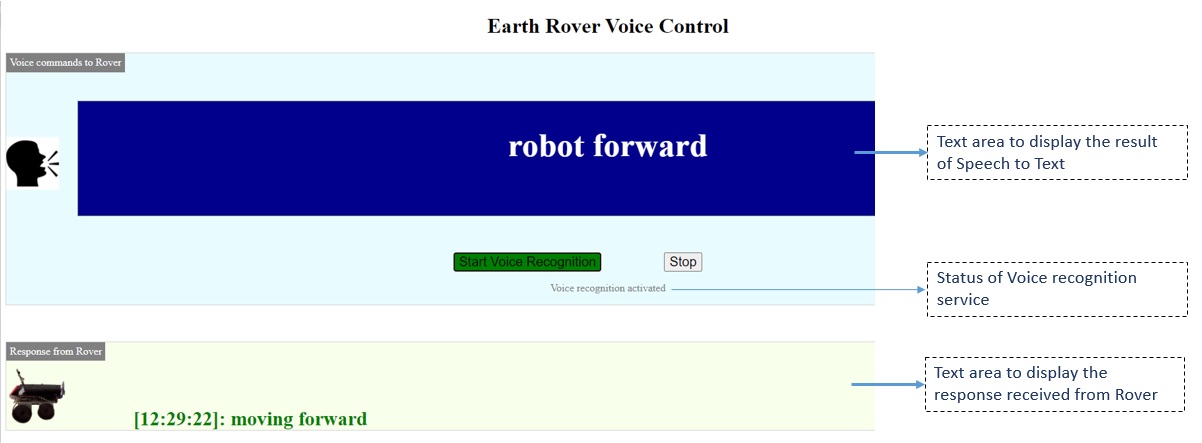
The various sections of the GUI are annotated in the picture below.
Following Javascript files are embedded in GUI.
 <script src="jquery.min.js"></script>
 <script src="script.js"></script>
‘jquery.min.js’ is used for implementing ajax functionality to send to converted text to server. In above example, the converted text i.e. “robot forward” is transmitted to the server.
You can test the functionality using the live demo using the link provided in ‘Project Description’ section above.
Code Walkthrough
script.js
When the GUI is launched, javascript files associated with it comes into action.
The javascript file ‘script.js’ begins with initialising the ‘SpeechRecognition’ object and other variables. In case the browser doesn’t support Web Speech API, it displays an error message.
To allow longer silence periods while giving voice input, the ‘continuous’ property is set to true.
try {
  var SpeechRecognition = window.SpeechRecognition || window.webkitSpeechRecognition;
  var recognition = new SpeechRecognition();
  $('.no-browser-support').hide();
}
catch(e) {
  console.error(e);
  $('.no-browser-support').show();
}

recognition.continuous = true;
After initialising the variables, the script wait for an event to happen.
On the press of ‘Start Voice Recognition’ button, following code is executed
$('#start-record-btn').on('click', function(e) {
  console.log("start recog");

  recognition.start();
  btn_start.css("background-color", "green");
});
above code calls the start() method which starts the speech recognition service in background.
Once the service has started, the ‘onstart’ event handler will execute. It is used for displaying a text message about the activation of the service.
recognition.onstart = function() {
  instructions.text('Voice recognition activated');
}
At this stage, the service is listening to incoming audio (voice commands). Any spoken word/phrase will be captured through the laptop’s or mobile phone’s microphone. An event handler ‘onresult’ will execute when the speech recognition service returns a result (a word or phrase) corresponding to the audio.
This event handler is used for displaying the result (text corresponding to speech) and passing the result to server
recognition.onresult = function(event) {
  // event is a SpeechRecognitionEvent object. It holds all the lines we have captured so far. We only need the current one.
  var current = event.resultIndex;

  // Get a transcript of voice.
  var transcript = event.results[current][0].transcript;

  //display the transcript
   noteTextarea.html(transcript);

  //invoke action()
   action(transcript);
};
The function ‘action(text)’ sends the transcript to a PHP file (action.php) in the server as post parameter via background ajax call. Further, it updates the element id ‘response’ with the data received from the server.
function action(text){
     console.log("text:" + text);
     $.post("action.php",
                  {txt: text},
                function(data,status){
                document.getElementById("response").innerHTML = data;
               }
     );
}
action.php
The file ‘action.php’ is responsible for the hardware control of the voice controlled robot.
The transcript sent by the ‘action()’ function of javascript file ‘script.js’ is received by this PHP file using a super global variable $_POST. The text is then trimmed to remove any white spaces and converted to lowercase.
$text=$_POST["txt"];

$text=trim($text);
$text=strtolower($text);
A valid command has minimum 02 words and maximum 03 words. The script calculates the number of words in the command using this code
$word=explode(" ", $text);
$sz=sizeof($word);
If the number of words are in valid range and the first word is ‘robot’, the script goes on to check the second word. If the second word is one of the pre-defined keywords, the corresponding function to control the hardware is executed.
if($word[0] == "robot" and $sz>1 and $sz<=3){

	if($word[1] == "forward"){
		forward(); //move the robot in forward direction
		echo"[$time]: moving forward<br>"; //this text is sent back to the client as an acknowledgement
	}
	elseif($word[1] == "backward"){
		back();//move the robot in forward direction
		echo"[$time]: moving backwards<br>"; //this text is sent back to the client as an acknowledgement
	}
	.
        .
        .
        .
}
else{
	echo"Invalid command<br>";
}
The functions forward(), back(), left(), right() etc control the GPIO pins of the Raspberry Pi. These functions are defined in a file called ‘vars.php’. This file is included in the begining of ‘action.php’ file.
Complete source code of the voice controlled robot project can be downloaded through this Github link.
Hi!
Very nice project. As a further enhancement, can we build the entire concept in RaspPi itself, without the need of a Laptop/PC/Mobile. I mean using a USB microphone, etc. To operate the Robot in a room.
Best regards,
Anil K Chikkam.
How much range this robot can control
the range depends upon your wifi network range.
connections from motor driver to raspberry pi
connection details are given here:-
https://helloworld.co.in/article/basic-robotics-make-robot-raspberry-pi-web-controls
Your Browser Doesn’t Support the Web Speech API ????
Try chrome. Also, install SSL certificates on Raspberry Pi webserver.
OR.. use these instructions to get all dependencies installed in automated way
https://helloworld.co.in/earthrover/