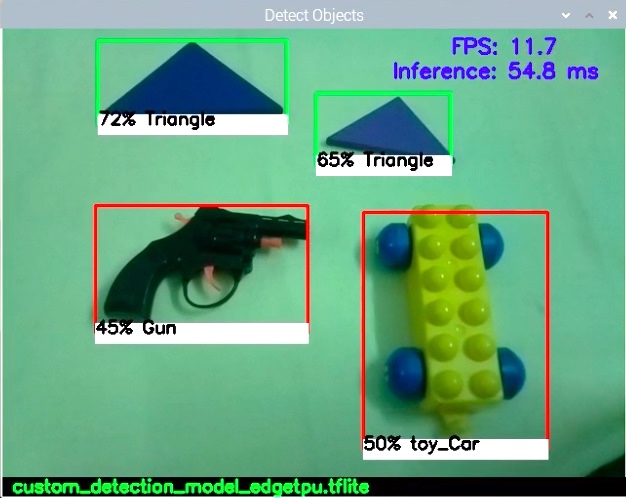
For object detection, there are many pre-trained models available for Edge devices such as Raspberry Pi. Most of them are trained using COCO dataset and can detect upto 90 types of common objects. However, in some applications there is a need to detect certain objects which are not present in the pre-trained models. In this case, you need to train a custom model for your use case. A snapshot of working of the model created for this project is shown below.
The process of training a custom model has been simplified to a great extent by the Tensorflow team with the introduction of Model Maker tool. Working of this tool is demonstrated by a Colab notebook created by Tensorflow Team member Khanh LeVit.
The steps involved in the custom model creation are as follows:-
– Data preparation
– Selecting the model architecture
– Training the model
– Evaluating the model
– Exporting the trained model
These steps are well explained in the colab notebook. You can save a copy of the original Colab notebook in your Google drive and personlise it by adding or modifying the information in it. I derived a notebook from the original notebook. The same can be accessed here.
In this article, I will cover the unique aspects related to my project.
Data Preparation
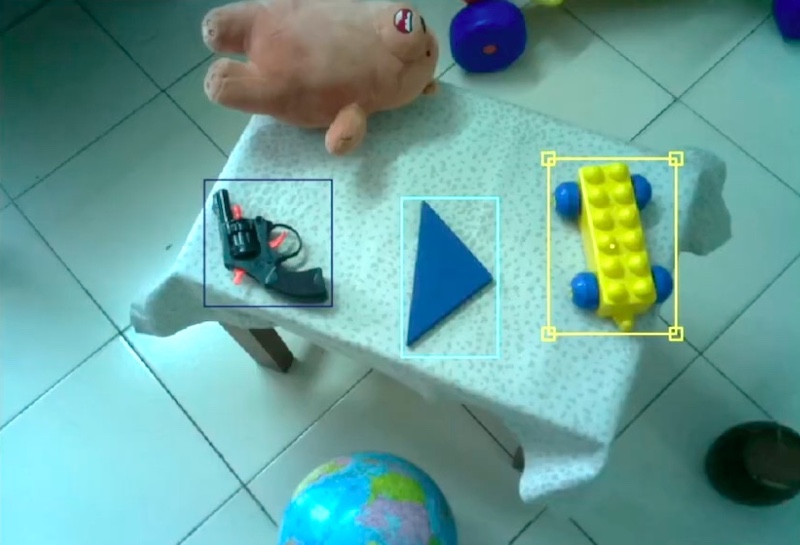
This part requires you to take pictures of the objects and label them using a labeling tool. Here, labeling means manually drawing the bounding boxes around an object in the image. The tool creates a xml or csv file containing this information. I used a tool called ‘RectLabel’. A sample image from my dataset with manully created bounding boxes around the objects of interest is shown below:-
The corresponding xml file generated by the tool containing the coordinate information of the objects is as shown.
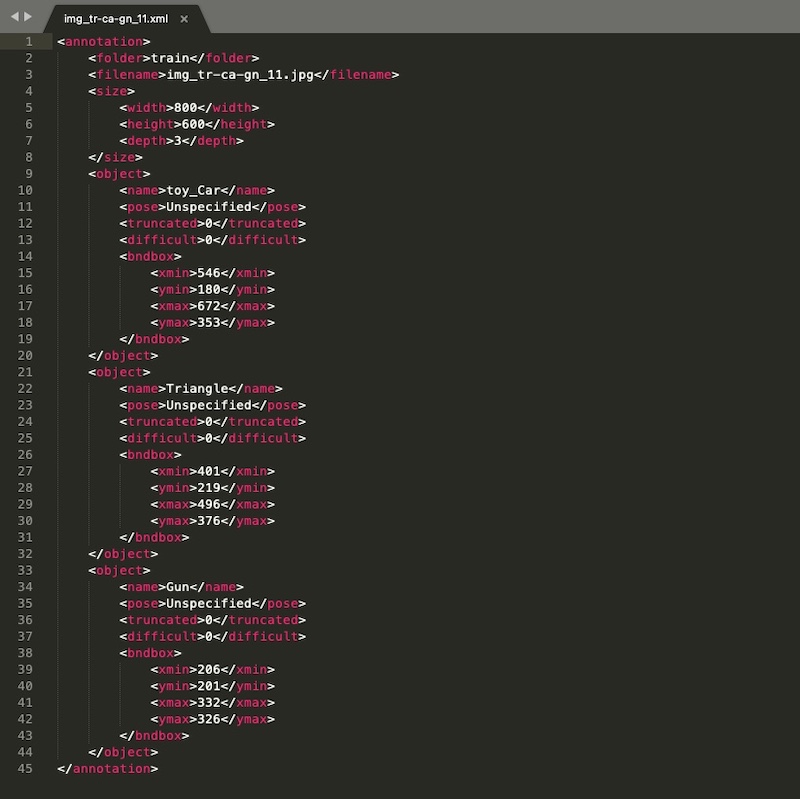
The tags ‘pose‘ and ‘truncated‘ are not generated by this tool. So I added these tags manually as they are required by the DataLoader function while loading the dataset in Colab notebook.
In this manner, I created 101 images for training and 15 images for validation. My dataset can be downloaded from this link.
Creating a Label File for the Model
Tensorflow Github page page provides a sample code for running an object detection model on Raspberry Pi. This code makes use of ‘tflite_support’ library to perform detection. This method does not require a separate label text file and uses the label information embedded in the model as metadata for this purpose.
However, in my case, I have created a label text file manually. I did this because ‘tflite_support’ library is not used for detection task in my project. The label file created for this project is shown below:-
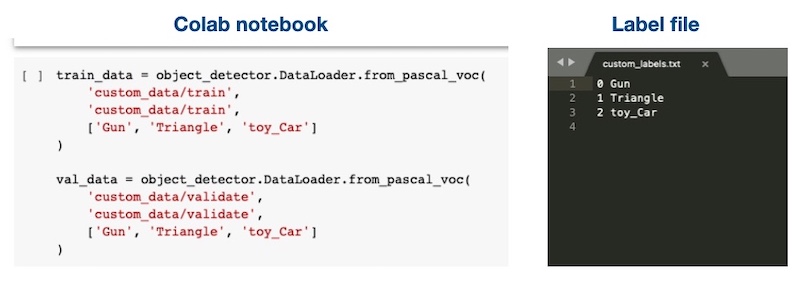
Please note that the order of labels provided during the training should be maintained while creating the label file.
Running the model on Raspberry Pi
An object detection model returns four parameters as a result of inference. These are as follows:-
– Scores
– Bounding Box coordinates
– Class ids
– Count of objects present in frame.
These details are stored in the output tensor and can be accessed by interpreter object. During the initial attempts, the code was throwing an error. So I checked the contents of output details of the tensor by simply printing it. I observed that the output details of the tensor are arranged in different order for the model created using Model Maker. This order is different for pre-trained models. The arrangement of the information in output details for a pre-trained model and custom model is shown below
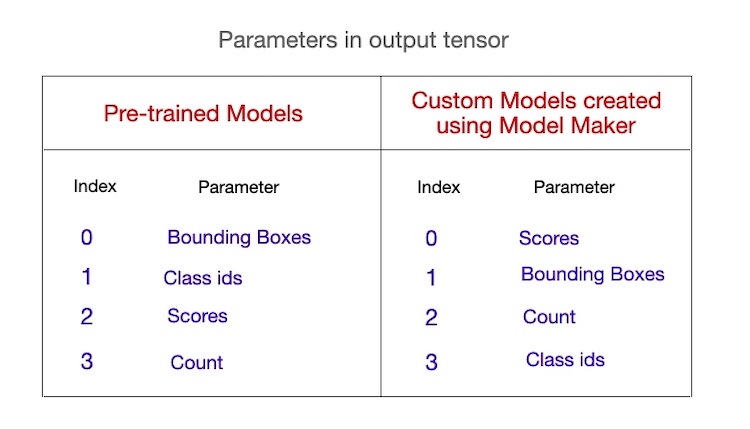
So, I modified the detection part of my code to adjust for the order of output details as per the custom model and it worked fine. The code snippet performing this task is shown below.
def detect_objects(interpreter, image, score_threshold=0.3, top_k=6):
    """Returns list of detected objects."""
    set_input_tensor(interpreter, image)
    #interpreter.invoke()
    invoke_interpreter(interpreter)

    global model_dir
    if (model_dir=='models/pretrained'):
      # for pre-trained models
      boxes = get_output_tensor(interpreter, 0)
      class_ids = get_output_tensor(interpreter, 1)
      scores = get_output_tensor(interpreter, 2)
      count = int(get_output_tensor(interpreter, 3))
    else:
      # for custom models made by Model Maker
      scores = get_output_tensor(interpreter, 0)
      boxes = get_output_tensor(interpreter, 1)
      count = int(get_output_tensor(interpreter, 2))
      class_ids = get_output_tensor(interpreter, 3)


    def make(i):
        ymin, xmin, ymax, xmax = boxes[i]
        return Object(
            id=int(class_ids[i]),
            score=scores[i],
            bbox=BBox(xmin=np.maximum(0.0, xmin),
                      ymin=np.maximum(0.0, ymin),
                      xmax=np.minimum(1.0, xmax),
                      ymax=np.minimum(1.0, ymax)))

    return [make(i) for i in range(top_k) if scores[i] >= score_threshold]
Observe how the parameters (boxes, class_ids, scores, count) are read differently for pre-trained and custom model in above code.
Running the Model with Coral USB Accelerator
The Colab notebook allows you to create a model for Edge TPU i.e. Coral USB Accelerator. The model worked fine with the code with modified detection part. On a Raspberry Pi 4 with 8 GB Ram, FPS of around 10 was observed.