From the archive: this project no longer works. IFTTT retired its Google Assistant trigger, so voice commands can no longer reach a Raspberry Pi this way. The project ran well for years, and this write-up stays as a record of how it was built. The Online Remote and the Raspberry Pi code it relies on still work; only the voice link is gone.
This project used Google Assistant to control the GPIO pins of a Raspberry Pi. It needed no code at all: an out-of-the-box way to control a Raspberry Pi with a Google Home device or the Google Assistant on a phone.
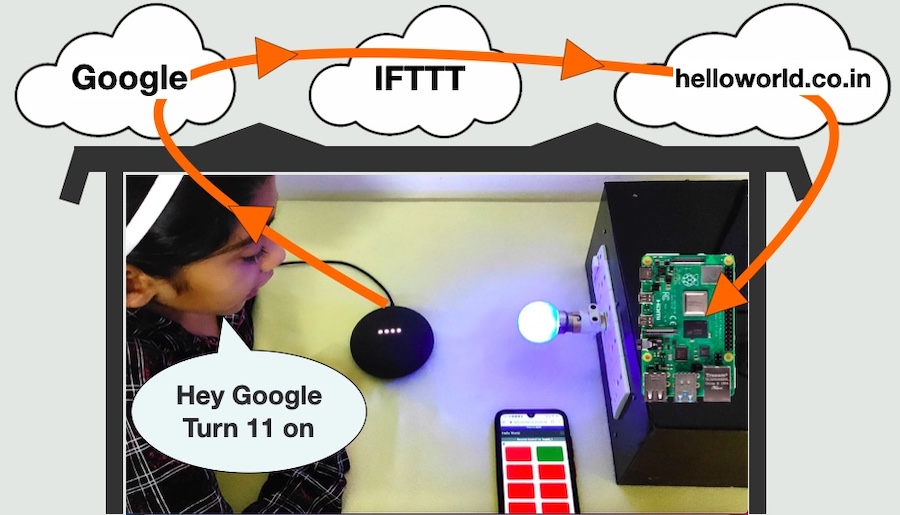
What the project needed
1. Google Home device OR Phone Google Assistant.
A Google Assistant took the voice commands. It could be a physical device such as a Google Home Mini, or the Google Assistant built into an Android phone.
2. An account with this website (helloworld.co.in)
An account on this website provided two things:
– A browser-based widget, the online remote. With it you told the website which Raspberry Pi pins you wanted to control. The website kept a GPIO state table in the cloud for those pins, and that table decided how the Raspberry Pi behaved.
– An authentication token (auth_token), pasted into the code running on the Raspberry Pi.
3. IFTTT Applet.
An applet on IFTTT forwarded the Google Assistant data to your helloworld.co.in account. The applet was the bridge between your Google Assistant and your helloworld.co.in account.
4. Raspberry Pi.
A Raspberry Pi controls external devices through its GPIO pins. The code running on it fetched the GPIO state table from your helloworld.co.in account and set the pins to match. With a relay board on those pins, it switched home appliances.
Each part is described below.
The Google Assistant
How Google Assistant Works normally
You speak to your assistant. The data goes to the Google cloud and processed. A suitable response is generated by Google and sent back to your device. Which is spoken back to you.
How this project used Google Assistant
You spoke to your assistant, beginning with a specific keyword. The data went to the Google cloud, which detected the keyword and fired an IFTTT trigger. IFTTT forwarded the text spoken after the keyword (the text ingredient) to the helloworld website through a webhook. The website read the command and updated the GPIO state table for your Raspberry Pi.
The helloworld account
This website provides IOT widgets which work with your Raspberry Pi to give you an out of the box serivce. One of the widget is Online Remote. This remote can be used to control the GPIO pins of your Raspberry Pi from anywhere through internet. The remote allows you to choose and configure the GPIO pins you want to control. Once configured, the pin numbers and their current state is stored in the cloud in a GPIO state table. The states of the pins in the cloud can be toggled through the remote.
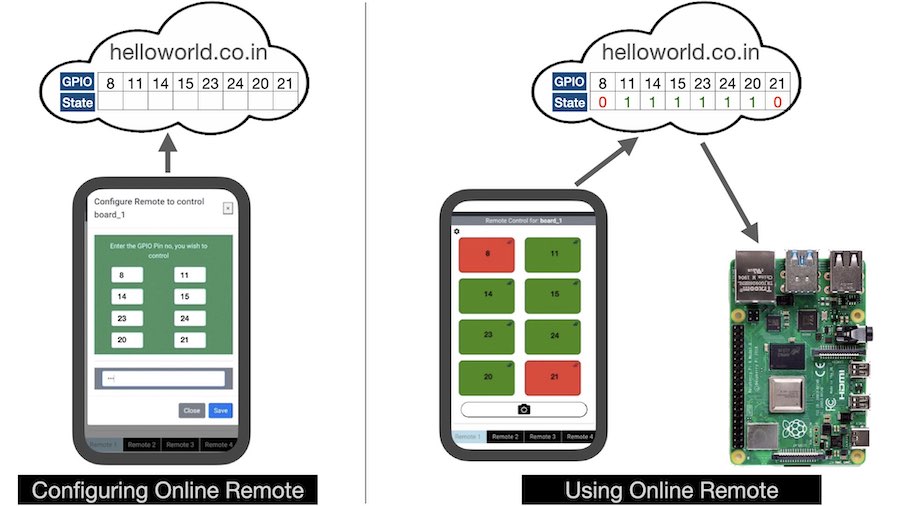
This project changed that state table with voice commands instead. Once the GPIO state table was set up, you spoke a pin number to your Google Assistant to make it High or Low.
Google Assistant and the Online Remote are two different web services running in different clouds. So how could Google Assistant change the GPIO state table in your helloworld account?
This is where IFTTT came in. It exists to bridge two web services through a trigger-and-action mechanism, and at the time a free account was all this project needed.
IFTTT Applet
IFTTT bridges two web services with applets. A free account then allowed up to 5 of them, and this project used just one, configured as shown below. An applet has two parts.
Part 1: IF
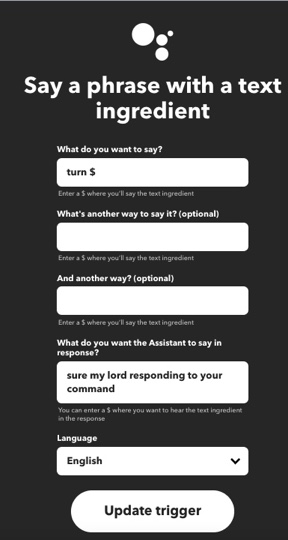
This part generated the trigger. The service was Google Assistant, with the ‘Say a phrase with a text ingredient’ option, and the trigger was filled in as in the example below. The keyword was ‘turn’, followed by a ‘$’ standing for the text ingredient (anything spoken after the keyword). IFTTT no longer offers this Google Assistant trigger, which is why the project stopped working.
Part 2: Then
This part handled the action when the trigger fired. The service was Webhooks, with the ‘Make a web request’ option, and the action was filled in as in the example below. It carried a URL unique to each helloworld account, copied from the webhook page.
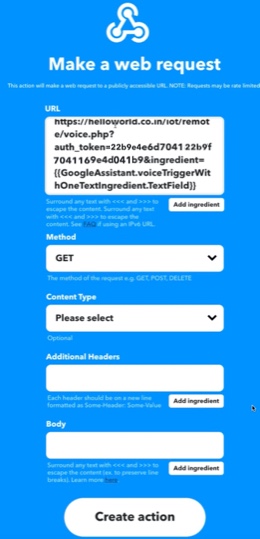
In the example above, ‘turn’ was the keyword. When Google Assistant heard it, the webhook sent a web request to the helloworld website with two parameters: your auth_token (your identity on helloworld) and the text ingredient (what you said after the keyword). The text ingredient had to be a valid command: the keyword followed by a GPIO pin number and its desired state. Saying “turn 14 OFF” made GPIO 14 Low, and “turn 14 ON” made it High again.
All the pins could be switched at once by saying:
– turn ON
– turn OFF
Checking the connection
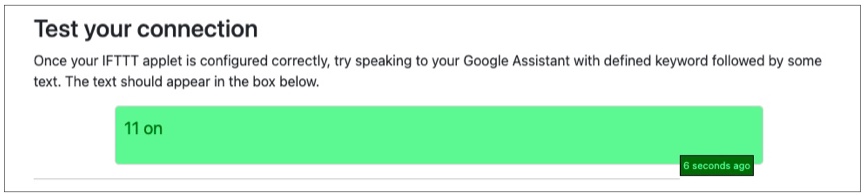
To confirm that the IFTTT configuration worked and voice messages were reaching the helloworld account, the webhook page showed the last text ingredient received in a green box, as below.
Raspberry Pi Configuration
This part still works today, with the Online Remote. To fetch the GPIO state table from your helloworld account, the Raspberry Pi runs code you can download from this Github link. The code fetches the GPIO state table from your account in helloworld website at a regular interval of time. Based on the state table data, the GPIO pins are set High or Low. You can see the detailed instructions for setting up this code in this article.
What it made possible
With this technique you could build your own smart switches and go beyond what commercial smart switches offered. Setting up the online remote, the IFTTT applet and the Raspberry Pi code took a matter of minutes.
The voice link is gone, but the Online Remote still controls the same pins from your browser. If you built this project while it worked, I would love to hear about it in the comments.
Hello
Getting Below Error
Unrecognized ingredient {{GoogleAssistant.voiceTriggerWithOneTextIngredient.turn}}
while putting url in THEN THAT any solution