Updated in September 2026 for Raspberry Pi OS 13 (Trixie). The code in this article now matches the robotics-level-4 repository. The way the robot follows a person is unchanged; what changed is how the camera is opened, how the Coral is found, and where things are installed.
The article describes making of a Human Following Robot using Raspberry Pi. The code is part of the robotics-level-4 repository, and one script installs it along with everything it needs — the LiteRT runtime, the Coral library and the models. The steps are in Replicate Earthrover Robot Software on your Raspberry Pi. Once installed, the robot’s control panel starts it from the AI Robotics row.
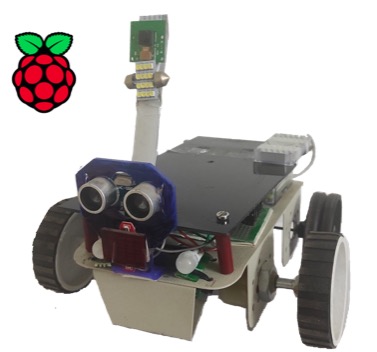 |
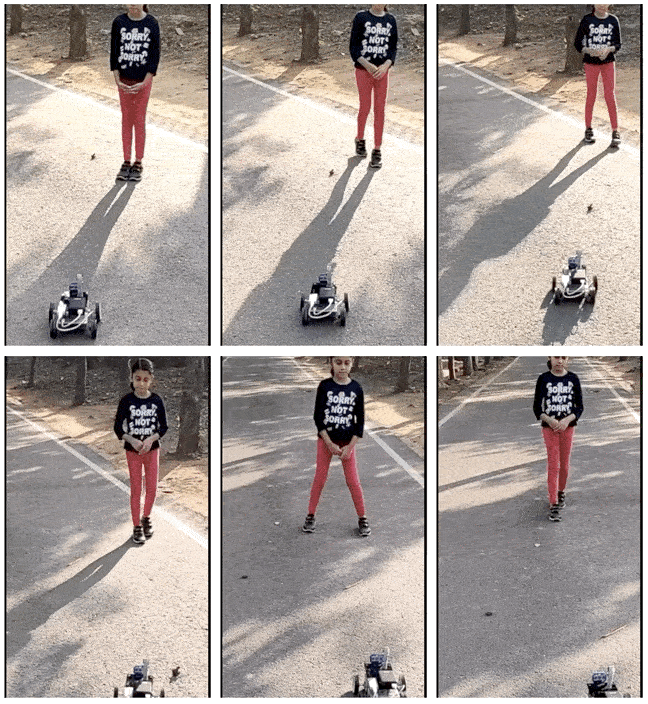 |
The details of the hardware and software components used in the project is as follows:-
|
Raspberry Pi 3A+ |
The main computer of the Robot |
|
Coral USB Accelerator |
Optional hardware to speed up the inferencing process. It is detected automatically, and the same code runs on the CPU without it |
|
Pi Camera or USB webcam |
The Raspberry Pi camera board on its ribbon cable, or any USB webcam |
|
MobileNet SSD v2 (COCO) |
Machine Learning Model which can detect the location of 90 types of objects in a picture |
|
LiteRT (ai-edge-litert) |
Python APIs for on-device machine learning inference — the successor to the TensorFlow Lite runtime |
The hardware connections /circuit diagram of this human following robot has been covered while describing its making in this article.
Human Following Robot: An Overview
The robot uses its camera to capture the image and feeds the image to Object Detection Machine Learning Model. The model returns the list of objects. This list is traversed to see if ‘person’ is present. If ‘person’ is present, then the tracking code kicks in. An overview of the process is shown in the picture below.
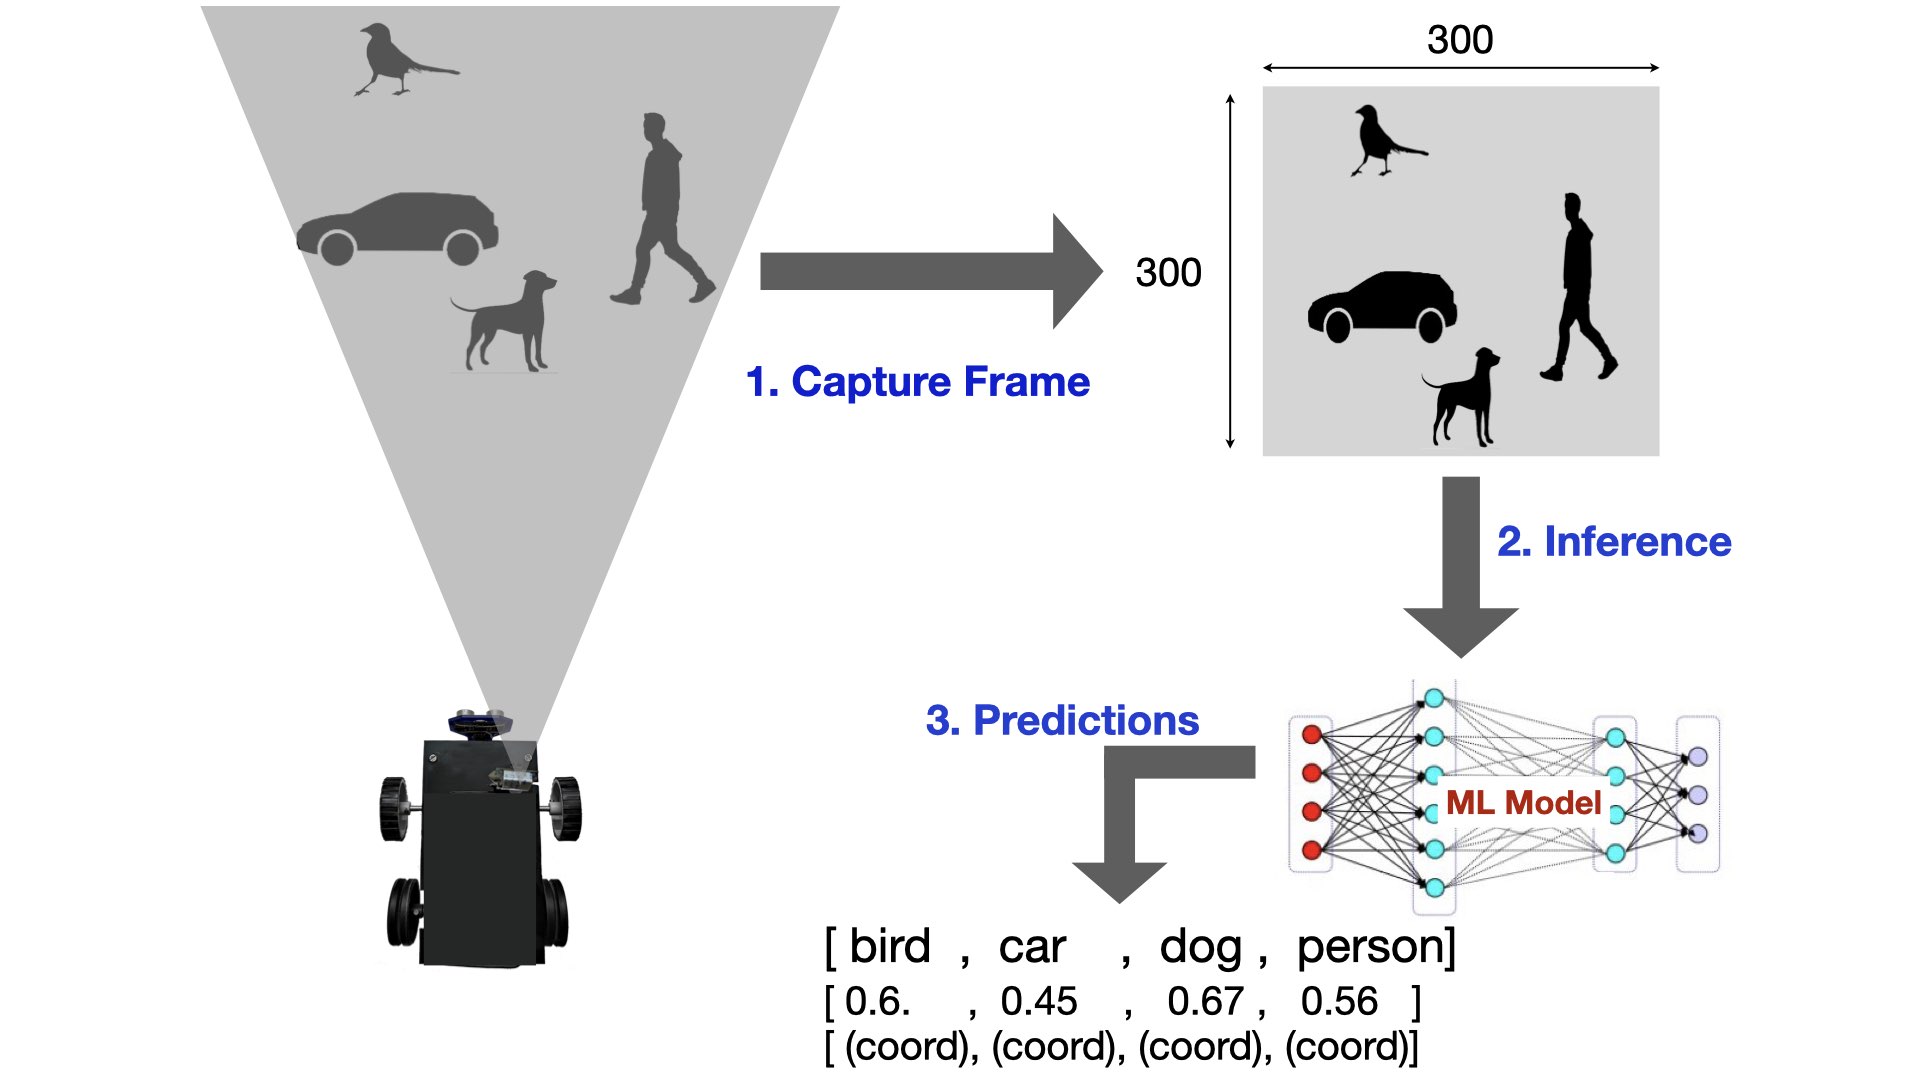
In order to appreciate this article, it is recommended that you keep referring the project code as you read through. In the code folder, both the files ‘human_follower.py’ and ‘human_follower2.py’ have the same purpose i.e. track a human and can be executed independently. The file ‘human_follower.py’ has extra lines of code for FLASK implementation and generation of overlays on the camera frame. The code pertaining to FLASK in this file streams the camera view along with custom overlays (created through OpenCV) over LAN. The streaming view can be monitored via a browser as shown in the picture below.
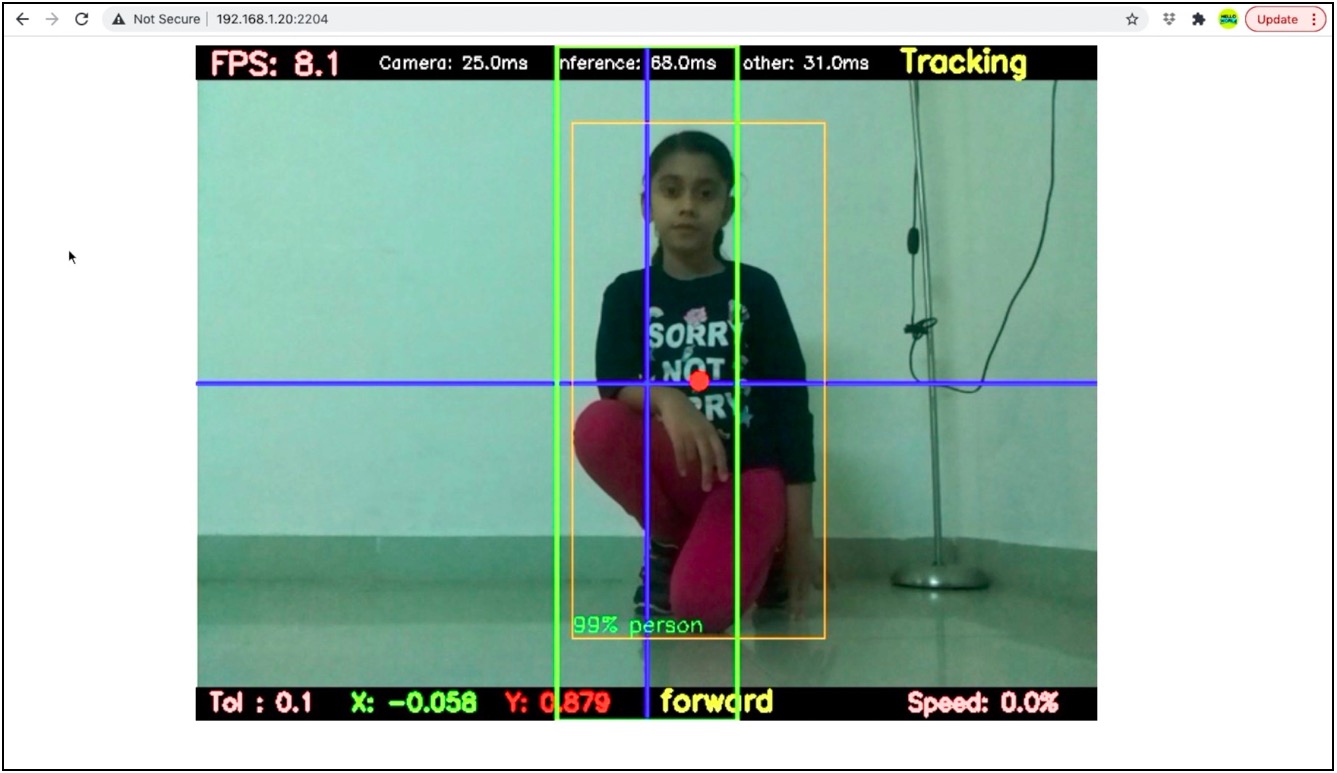
The file ‘human_follower2.py’ is a stripped down version and does not implement FLASK. It is the bare minimum implementation of a human following robot using an Object Detection Machine Learning model. You can refer to ‘human_follower2.py’ file while reading this article further. The control panel runs ‘human_follower.py’, because it shows the robot’s view while it follows.
How it works
The code of Human Following Robot begins with initialising certain parameters. These are explained in the comments below.
#camera_compat opens the ribbon camera or a USB webcam, whichever is attached
import camera_compat
cap = camera_compat.VideoCapture(0)

#threshold of prediction probability (or score). The model will consider an object detected if its score is above this value
threshold=0.2

#keep the top 5 objects which cross the above threshold.
top_k=5

#1 when a Coral USB Accelerator is attached, 0 otherwise - util.py works it out
from util import edgetpu

#path where the model file is located
model_dir = '/var/www/html/all_models'

#model files: one for the CPU, one compiled for the Coral
model = 'mobilenet_ssd_v2_coco_quant_postprocess.tflite'
model_edgetpu = 'mobilenet_ssd_v2_coco_quant_postprocess_edgetpu.tflite'

#label file corresponding to the model file
lbl = 'coco_labels.txt'

# distance from center of frame on both sides. The object being tracked must be brought inside this zone while tracking
tolerance=0.1

# deviation of the center of object from center of frame
x_deviation=0

# Y coordinate of the bottom edge of the bounding box
y_max=0

# This is the name of the object which is required to be tracked by the code
object_to_track='person'
Inside the main function, the code begins with setting up the interpreter
mdl = model_edgetpu if edgetpu == 1 else model
interpreter, labels =cm.load_model(model_dir,mdl,lbl,edgetpu)
The function ‘load_model()’ is defined in the ‘common.py’ file. This function initialises the tflite interpreter based on the model and label files passed as the parameters. The variable ‘edgetpu’ tells it whether a Coral USB Accelerator is present, and picks the matching model file. It is not set by hand: util.py looks for the Coral on the USB bus and checks that its library is installed. The 2021 version of this file set edgetpu=1 itself and could not run at all without a Coral; now it runs on the CPU too, only slower. To force one or the other, start it with EARTHROVER_EDGETPU=0 or EARTHROVER_EDGETPU=1. Installing the Coral library on current Raspberry Pi OS is covered in the Coral article. After initialising the interpreter, the code continuously loops to perform the three tasks as shown in the picture below.
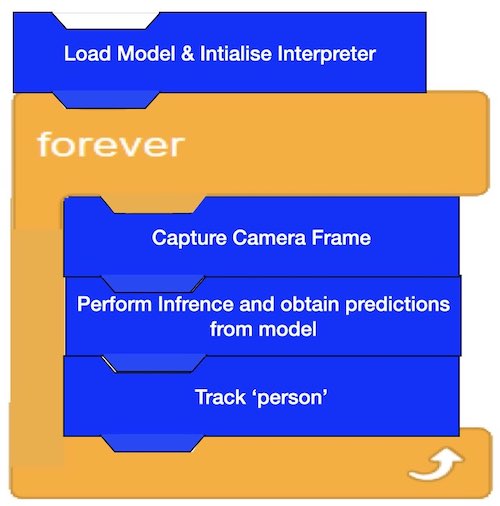
The overall FPS depends upon the time taken by the three steps inside the loop. The breakdown of time taken by these steps, as measured in 2021, is as follows:-
|
Capture Camera Frame |
20 ms approx |
|
Perform Inference and obtain Prediction |
60 ms approx |
|
track ‘person’ |
20 ms approx |
|
Total time |
100 ms |
|
FPS |
1/(0.1 s) = 10 |
The presence of Coral USB Accelerator speeds up the second step to a large extent. Without acceleration, this step could take upto 600-900ms, bringing down the FPS drastically. These values are measured for Raspberry Pi 3A+ which has 64 bit quad-core @ 1.4 GHz CPU and 512 MB RAM. The overall FPS can be improved further by using latest Raspberry Pi 4 model.
Measured again in 2026, on the same Raspberry Pi 3A+ running Raspberry Pi OS 13: with the Coral, inference takes 53 ms and the robot runs at 12.8 FPS. The CPU is also much quicker than it was — about 230 ms for this model on this board (measured with the Object Detection project, which uses the same model) instead of 600-900 ms — but the Coral is still four to five times faster.
Lets see what happens in the three steps shown in the picture above.
1. Capture Frame. The code below captures a frame and converts it in a format that is required by the Object Detection model. The 2021 code also flipped every frame here; the orientation is now set in config.txt and applied once, when the camera opens. Then it feeds the frame to the input tensor of the interpreter.
ret, frame = cap.read()
if not ret:
     break

cv2_im = frame
# orientation comes from config.txt, applied when the camera opens

cv2_im_rgb = cv2.cvtColor(cv2_im, cv2.COLOR_BGR2RGB) # change color scheme
pil_im = Image.fromarray(cv2_im_rgb) # convert into array

cm.set_input(interpreter, pil_im) # provide the frame as input to the interpreter
2. Inference. This one line of code does the job of interacting with model to obtain the list of predictions. This part is called ‘inference’ which takes up more than half of the processing time. Coral USB Accelerator is used to bring down this processing time.
interpreter.invoke()
3. Predictions. Once the above line completes execution, the output tensor of the interpreter holds the information with respect to the objects present in the frame. This information is accessed using ‘get_output()’ function (defined in the file ‘common.py’) as shown below.
objs = cm.get_output(interpreter, score_threshold=threshold, top_k=top_k)
The variable ‘objs’ holds following information with respect to each object:-
– Class Name
– Score (prediction probability)
– Coordinates of the bounding box
Tracking a Person
The list of objects along with the labels are passed to the track_object() function.
track_object(objs,labels) #tracking
The tracking function begins with checking if the list of objects is empty. If it is empty, the function returns and there is no further processing.
def track_object(objs,labels):

    global x_deviation, y_max, tolerance

    if(len(objs)==0):
        print("no objects to track")
        ut.stop()
        ut.red_light("OFF")
        return
If the list of objects is not empty, then one by one code checks whether the object name matches the desired object (i.e. person). In case, there is no match found, relevant message is printed and the function returns without proceeding further. If there is a match, then the code stores its coordinate information and proceeds further.
    flag=0
    for obj in objs:
        lbl=labels.get(obj.id, obj.id)
        if (lbl==object_to_track):
            x_min, y_min, x_max, y_max = list(obj.bbox)
            flag=1
            break

    #print(x_min, y_min, x_max, y_max)
    if(flag==0):
        print("selected object no present")
        return
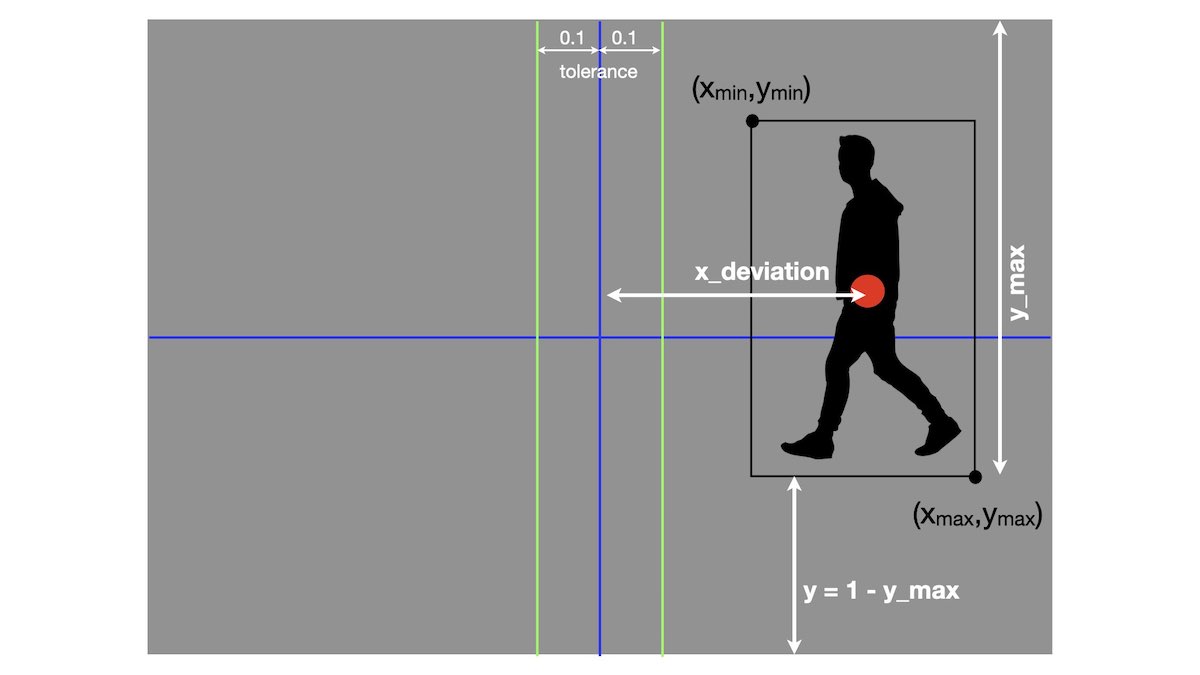
The below code is executed only if the object list is not empty and it contains a ‘person’. Here, the code calculates the deviation of the person from the center of the frame as shown in picture.
    x_diff=x_max-x_min
    y_diff=y_max-y_min

    obj_x_center=x_min+(x_diff/2)
    obj_x_center=round(obj_x_center,3)

    obj_y_center=y_min+(y_diff/2)
    obj_y_center=round(obj_y_center,3)

    x_deviation=round(0.5-obj_x_center,3)
    y_max=round(y_max,3)

    print("{",x_deviation,y_max,"}")
At this stage, the we know the exact position of the person inside the frame. Now, we can move the human following robot to bring the person in center. It is done by calling ‘move_robot()’ function inside a thread.
    thread = Thread(target = move_robot)
    thread.start()
Movement of Robot
Forward movement of the robot
Using the information calculated in track_object() function above, the code here simply checks if the center of ‘person’ is below the ‘tolerance’ value. If yes, the code checks if the distance between bottom of bounding box and bottom of frame is below the set margin. If yes, then there is no need to move. Otherwise, move forward.
def move_robot():

    global x_deviation, y_max, tolerance

    y=1-y_max #distance from bottom of the frame

    if(abs(x_deviation)<tolerance):
        if(y<0.1):
            ut.red_light("ON")
            ut.stop()
            print("reached person...........")

        else:
            ut.red_light("OFF")
            ut.forward()
            print("moving robot ...FORWARD....!!!!!!!!!!!!!!")
Across movement of robot (Right – Left motion)
This part is executed whenever the ‘person’ moves out of the tolerance zone. The robot moves left or right to get the person in the center of frame.
    else:
        ut.red_light("OFF")
        if(x_deviation>=tolerance):
            delay1=get_delay(x_deviation)

            ut.left()
            time.sleep(delay1)
            ut.stop()
            print("moving robot ...Left....<<<<<<<<<<")


        if(x_deviation<=-1*tolerance):
            delay1=get_delay(x_deviation)

            ut.right()
            time.sleep(delay1)
            ut.stop()
            print("moving robot ...Right....>>>>>>>>")
Running it from the control panel
In the control panel, Human Following in the AI Robotics row starts ‘human_follower.py’, and the panel waits until the robot’s view is really streaming before showing it. Only one program can hold the camera, so the ordinary camera view goes off while it runs. The follower also sets its own motor speed, so the speed slider stops working while it runs and comes back when you stop it. It refuses to start while collision avoidance is on, because both need the motor pins.
I hope you enjoyed this article. If you have any questions, ask me in the comments below.
Have a nice day;
Very nice work, congratulations. I tried it with these codes and using a raspberry pi 3 model b card. I used a Raspberry pi camera. But the fps rate seems low and detection remains slow for this reason. I want it to follow me, but since the image detection FPS speed is very low, it detects my movements late. How can I solve this problem? Where am I making mistakes?
sir, i want to build this human following robot project with omni four wheel motor. is it possible? how it works? hoping for your answer thank you
What OS was used for the project.. i used ubuntu 204 and having problems with RPIO and tensorflow lite. Its because of the root access requirement of RPIO but when i run the code it using sudo command tensorflow runtime is not to be found
You need to use Raspberry Pi Legacy OS
Can I use this code to raspberry pi 4?
Yes, you can use it on Pi 4
Thank you for your awesome code.
I love you.
Hi, if many persons are in front of your robot, how can your robot detect and follow the target person ???
Sir, have you tried implementing YOLO algorithm? if yes, then was there any major improvement in FPS without using the Coral accelerator?
Hi Aditya, Sorry I haven’t tried YOLO. But i’m sure that there won’t be major improvement without Coral Accelerator.
Hello Friend, Would you be able to add the PAN-TILT in the human follow-up? Because with camera movements improves the accuracy of tracking the man. could you add this code?
You need to have a fixed position of camera for this code. Tracking is done by moving the entire robot to get the person in the center of frame. PAN-TILT won’t work with this code
Very Good project!!!
Can i use Raspberry pi b+ For this project.
Please Tell me!!
What is the unit of distance measurement used inside this project ? Thanks
I built a balancing robot on 2 wheels that the motors are connected to an Arduino.
How can I send your code through Raspberry Pie to the motors connected to the Arduino.
Hi awesome work.
Would the same code be sufficient if coral is not used?
(Ie will the project work with the same exact steps with the absense of coral albeit with more time taken)
Yes, it will work. Just make the variable ‘edgetpu=0’ in util.py file.
Hello which is the util.py file such a file does not exist.
Is it the common.py file?
Its there in ‘earthrover’ folder. Check the github link of this project
Brother plzz i want the hardware joining and code implementation of this robot….plzzz i really want it for my college project
its same as described here
https://helloworld.co.in/article/basic-robotics-make-robot-raspberry-pi-web-controls
Im also working on this project (college project) help me…PLZZ..i need ur guidence