Apply Machine Learning in DIY Robotics. Thanks Google for Teachable Machine
In this project we are going to train a Machine Learning model using “Teachable Machine” online tool by Google to recognise human gestures. The model is Exported & Deployed on a Raspberry Pi robot to control it through human gestures.
The article covers following aspects:-
- What is Teachable Machine?
- Using Teachable Machine to create ML models
- Exporting the ML model created through Teachable Machine
- Customisations and Modifications
- Code walk through
- Deploying the model on Raspberry Pi
Let’s build it.
What is Teachable Machine?
Teachable Machine is an online web-based tool, created by Google, which can be used to create Machine Learning models without writing any code. you can access it from this link:-
https://teachablemachine.withgoogle.com/
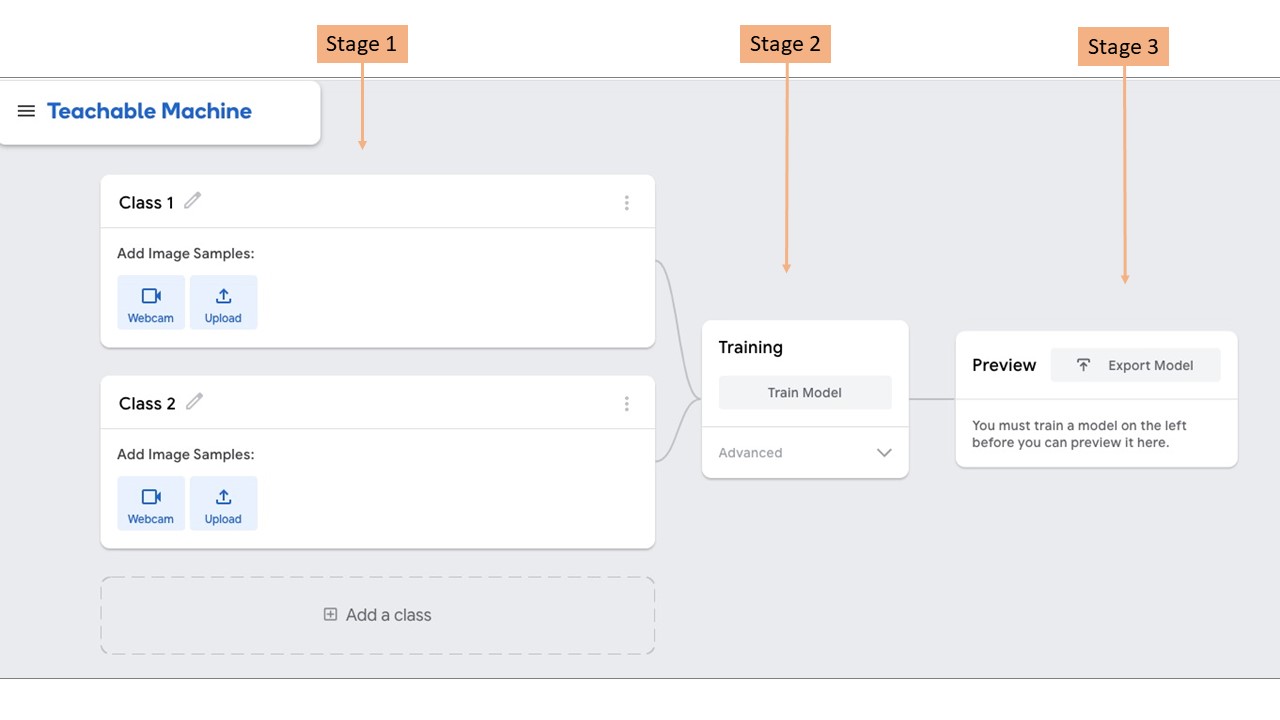
In any project involving creation and deployment of a Machine Learning model, there are certain inescapable stages which are required to be traversed. These stages can be summarised as follows:-
Stage1: Gather data samples and pre-process the data
Stage2: Create a Suitable Machine Learning Model with Convolutional and Deep Neural Networks and Train it with your data
Stage3: Deploy the model and carry out Inference and Prediction
Without a tool like Teachable Machine, one has to implement each of the above stages manually. Often, implementation of these stages require sound understanding of this field with expertise in programming languages such as Python / R .
Teachable Machine absorbs all that complexity and provides a simple GUI (shown below) which implements all the stages mentioned above to get you started and enables you to experiment with Machine Learning models in the quickest possible way. The GUI is quite intuitive which depicts the various stages in a sequential flow as shown below.
As of this writing, you can create 3 types of Machine Learning models using Teachable Machine. One, that can recognise images. Second, that can recognise sounds and third that can recognise body poses. For this project, i have used the Image Model and trained it for my use case.
Using Teachable Machine
Gather Data
The first stage is to gather the data samples. The data in this project is images. You can either upload the images or allow to tool to access the webcam of your device to capture them. Once allowed, the tool accesses the webcam of laptop and starts capturing the images as long as you hold the record button.
You can group different types of gestures in different classes and name them accordingly. In my case i have taken picture samples under 7 classes as shown below.

For every class shown above, approximately 250-300 picture samples were taken through webcam. So, in total, around 2000 images were taken to train the model. Later in the article, i will explain how to use them to control the robot.
Train the model
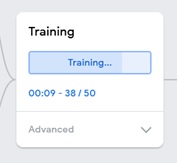
Training can be initiated by clicking the button ‘ Train Model’. Behind the scene, Teachable Machine trains a Machine Learning Model with the data we just captured through webcam.
The model created using Teachable Machine tool is a Tensorflow.js model. The ‘js’ here is Javascript. It means that the process of inference and prediction on this kind of model is performed using javascript or in other words you simply need a browser. As per Teachable Machine, all the training happens in your browser, so everything stays in your computer.
Deploy & Preview
Once the training is finished, the trained model is deployed automatically and it starts providing the predictions on the inputs from webcam. The accuracy of the model can be tested in the preview section of the tool. If the captured data was sufficient and categorised properly, the model will start recognising the gestures distinctly. When a gesture is distinctly recognised, the percentage bar next to it approaches 100% as seen in the picture below.
Under the hood, the javascript code embedded in the web page continuously captures the images through web cam. For each frame, the code performs inference using the model you just trained. The model returns prediction probabilities with respect to the classes it was trained with. More the resemblance with a class, higher its prediction probability. The picture shown below tries to emphasise the fact that for every webcam frame input, the trained model returns probabilities of its match with all the classes. Since, I have trained the model with 7 classes, it returns the prediction probabilities w.r.t these 7 classes. You can define any number of classes based on your application. When the data in a frame is closer to a particular class, the prediction probability returned by the model for that particular class is higher in comparison to other classes.
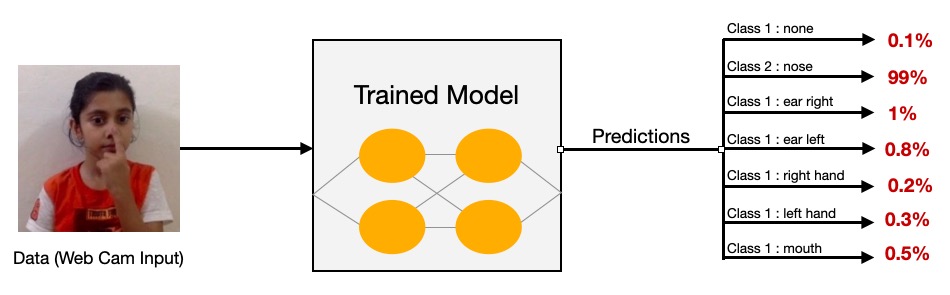
In above example, the probability returned by the model for nose touching gesture is 99% and for others is less than 1%. That means the model can distinctly recognise this gesture. These probabilities fluctuate as the subject moves in front of the webcam.
This is the default deployment scenario provided by Teachable Machine, wherein, the model gets trained and deployed in the browser. Now, the interesting part is that you can export this trained model and tweak the snippet provided in the export section to make it work in your application outside the Teachable Machine. Let’s see how to do that.
Exporting the model created using Teachable Machine
In order to use the model in other project, you need export it using ‘Export Model’ button in preview section. When you press ‘Export Model’ button, a screen appears as shown in the pic below. The key points to remember while downloading the model are annotated on the pic below.
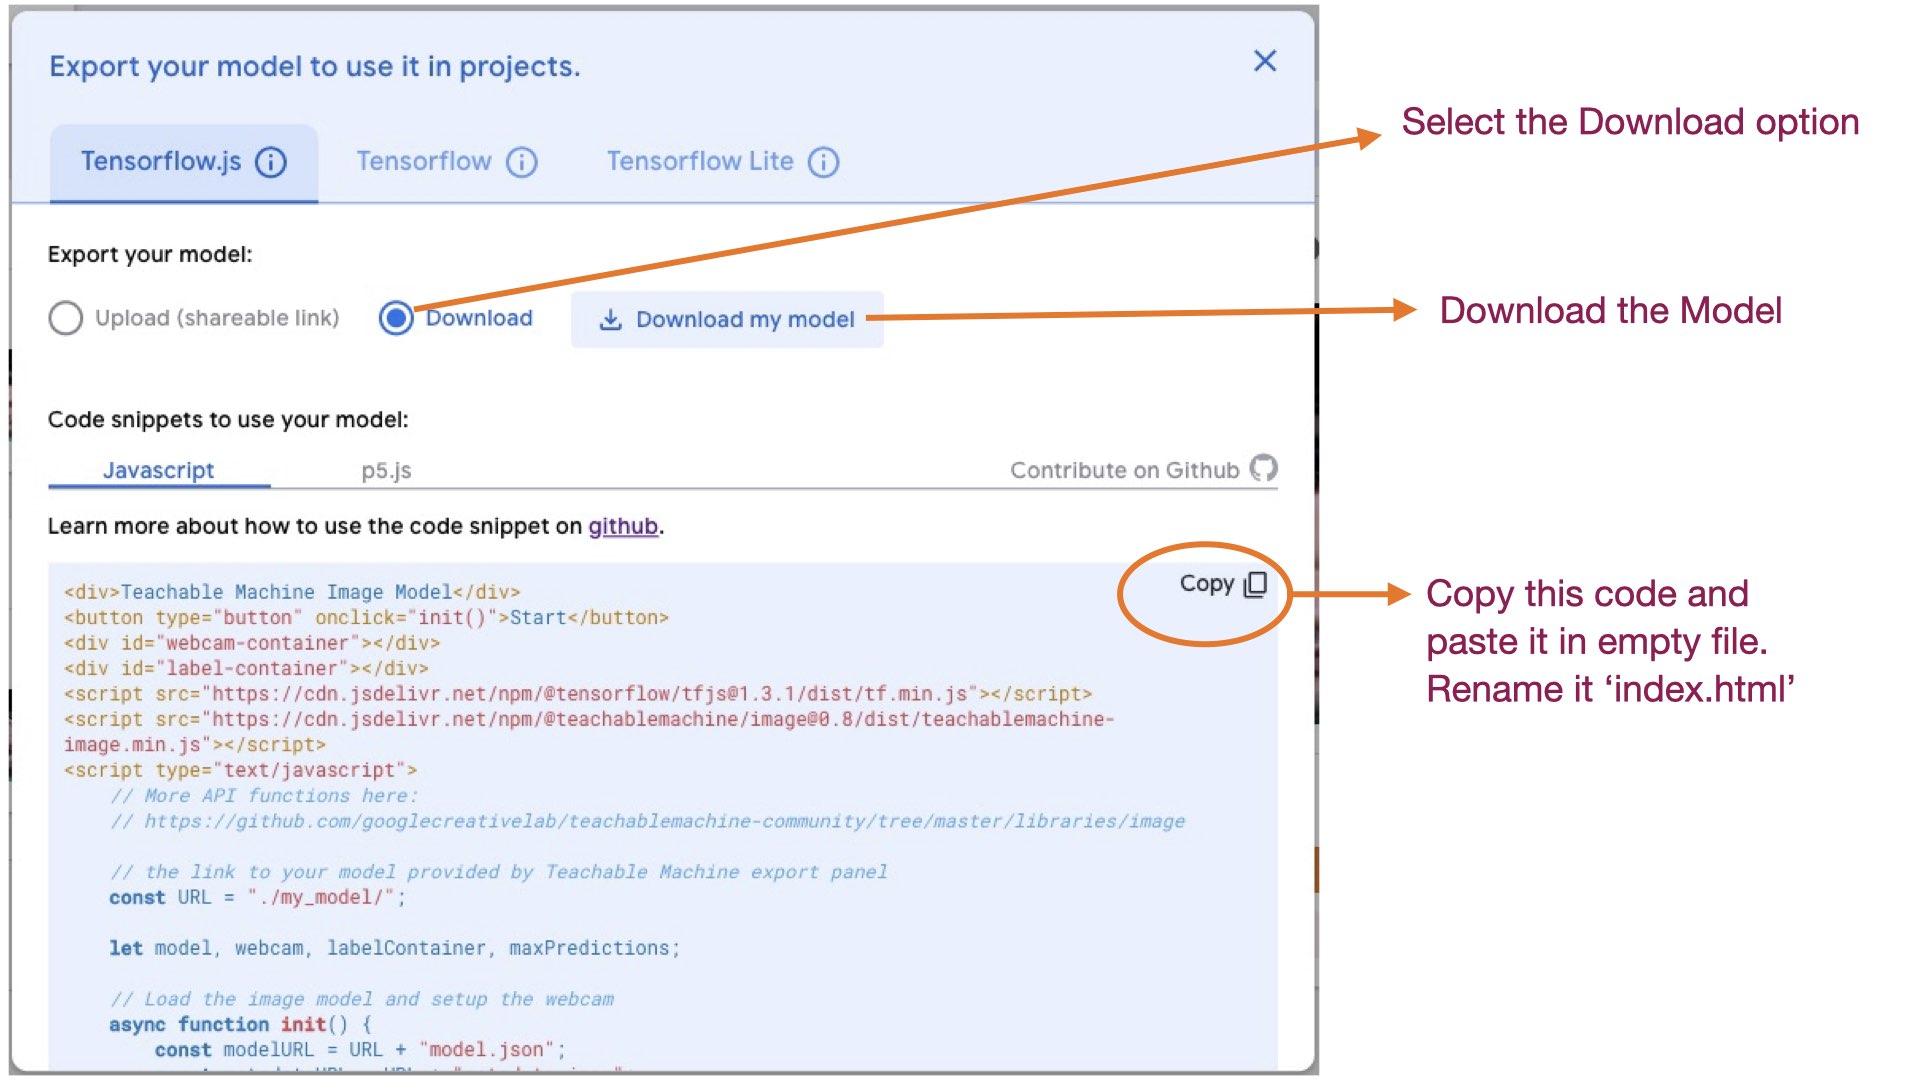
The downloaded model has 03 files in it “metadata.json”, “model.json” and “weights.bin”. The “weights.bin” is a serialised model file that contains all the training information.
Now, create a directory with some name, let’s say, ‘tm’. Copy the model files and ‘index.html’ file (containing the default code snippet, shown in pic above) in the ‘tm’ folder. So there are now 04 files in ‘tm’ folder.
In order to use these files, you need a webserver running on the platform where you want to deploy them. In my case, i wanted to control my Raspberry Pi robot using this model, so i installed a Webserver on Raspberry Pi.
Lets see the customisations and modifications that are required in the default code snippet prior deploying the model on Raspberry Pi.
Customisations and Modifications in Teachable Machine default code
We will start with tweaking the default code snippet which is placed in the ‘index.html’ file. Before we make any changes to this file, lets have a look at the default code provided by Teachable Machine.
‘index.html’ (default code snippet)
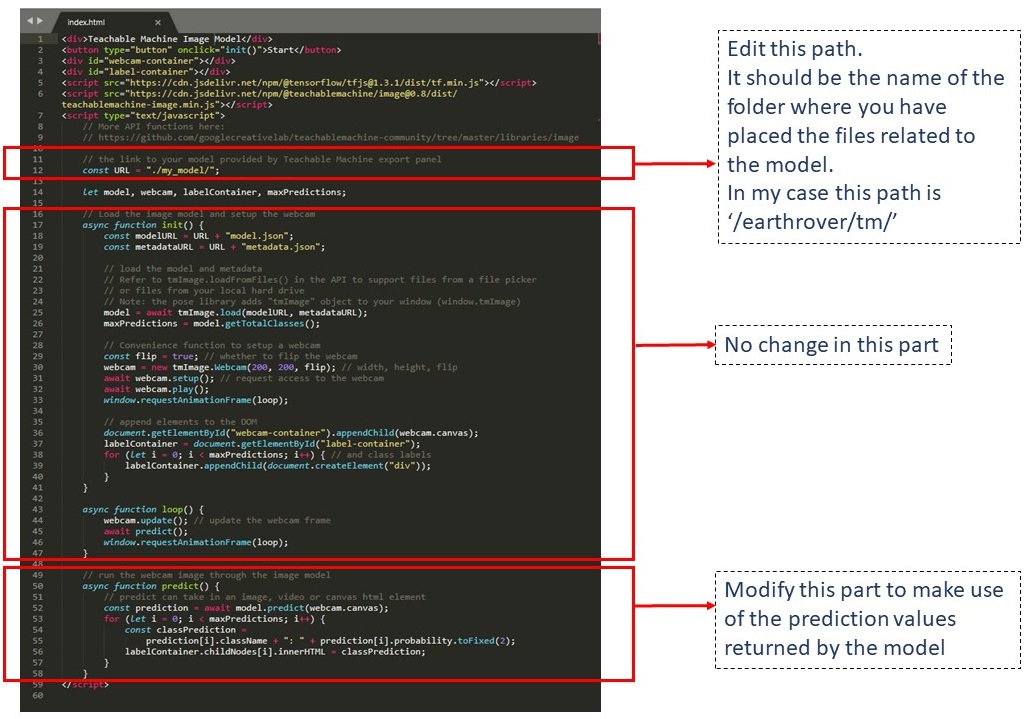
Post carrying out the modifications brought out in picture above, the file looks like this:-
‘index.html’ (modified)
As you can see, the ‘send_data(msg)’ function sends data to a PHP file named ‘ajax_action.php’. This is the 5th file that is required to be placed inside the ‘tm’ folder.
This is a custom PHP file that receives data from the javascript code (running in the browser of client) and based on the value received, it interacts with the GPIO pins of Raspberry Pi to actuate the motors. Have a look at this file:-
‘ajax_action.php’ (added)
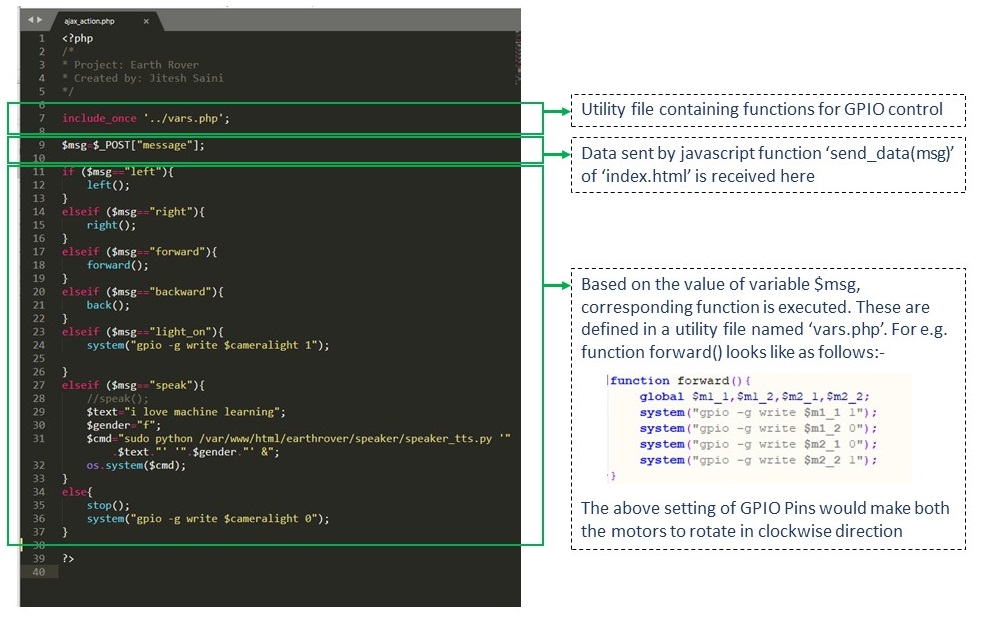
In order to speak out a text message, the PHP file invokes a Python file named “speaker_tts.py” with arguments ‘text’ and ‘gender’. This Python file implements a text to speech functionality(espeak) to generate voice.
Code walk through
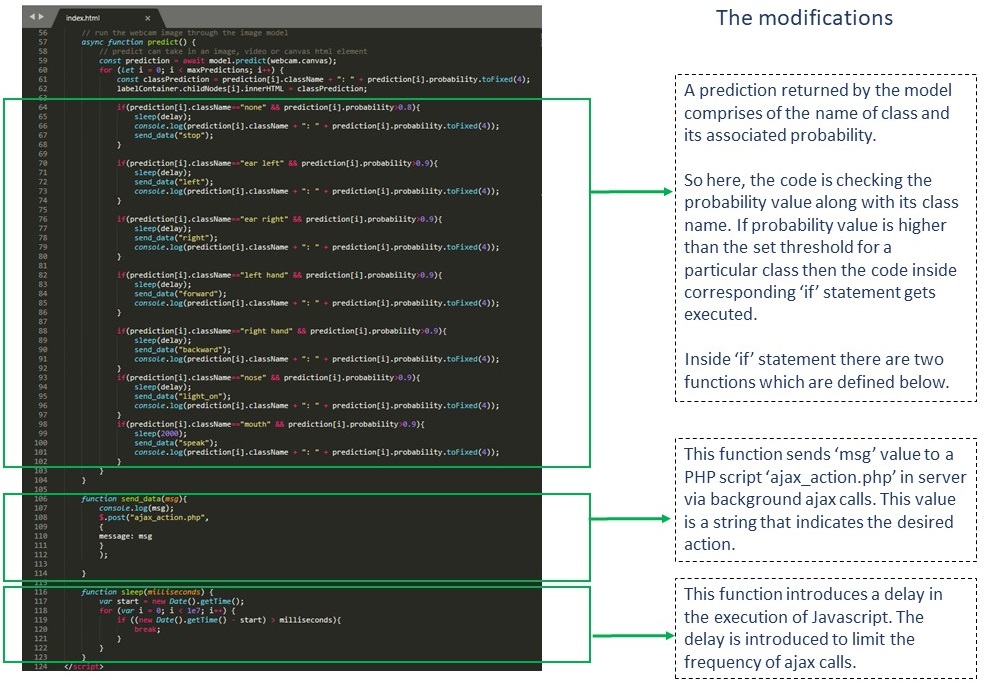
The code of ‘index.html’ file is elaborated below. This section explains the modifications carried out and their functionalities. The modifications are highlighted with green background.
=> Added a container on top of the page to display a page title
<div>
    <h1 align='center' style='color:brown;'>Earth Rover: Machine learning controls</h1>
    <h2 align='center' style='color:green'>Teachable Machine Image Model</h2>
</div>
=> Button which starts the whole process
<button type="button" onclick="init()">Start</button>
=> Containers to display Webcam data and the labels returned by the model. Added CSS style to webcam and label containers to adjust height, width and color.
<div align='center' id="webcam-container" style='border:1px solid grey; height:50%;width:50%'></div>
<div id="label-container" style='border:1px solid grey;background-color:lightyellow; width:50%;margin-top:3%;font-size:20px;'></div>
=> Scripts provided by google. These are the files that are responsible for carrying out inference and prediction through browser.
<script src="https://cdn.jsdelivr.net/npm/@tensorflow/tfjs@1.3.1/dist/tf.min.js"></script>
<script src="https://cdn.jsdelivr.net/npm/@teachablemachine/image@0.8/dist/teachablemachine-image.min.js"></script>
=> Script added for implementing background ajax communication with server
<script src="/earthrover/js/jquery.min.js"></script>
Rest of the code is javascript code defined within <script></script> tags. Which starts with variable decalaration followed by 05 function definitions. Out of these 5 functions, 02 functions i.e. init() & loop() have not been modified at all. Function predict() has been modified and other 02 i.e. send_data(msg) and sleep(milliseconds) have been added.
=> Variable declaration: provided the path of the directory containing the downloaded model.
var delay = 200;

// the link to your model provided by Teachable Machine export panel
const URL = "/earthrover/tm/";

let model, webcam, labelContainer, maxPredictions;
=> On press of ‘Start’ button, ‘init()’ function is executed. It is responsible for loading the trained model (from the path defined above) and setup the webcam. Read the comments in the code to appreciate its working.
// Load the image model and setup the webcam
    async function init() {
        const modelURL = URL + "model.json";
        const metadataURL = URL + "metadata.json";

        model = await tmImage.load(modelURL, metadataURL); // load the model and metadata

        maxPredictions = model.getTotalClasses(); //Obtaining the number of classes. These are the number of classes that you have created while training the model. In my case, this number is 7. The classes I created for this project are: none, ear left, ear right, left hand, right hand, nose & mouth.  If the model was trained with 100 classes, then this value would be 100.

        const flip = true; // whether to flip the webcam

        webcam = new tmImage.Webcam(350, 350, flip); // (width, height, flip). You can adjust the width and height of the webcam display by changing these parameters.

        await webcam.setup(); // request access to the webcam
        await webcam.play(); //start the webcam
        window.requestAnimationFrame(loop); //call the function loop() to update the webcam frame

        // append elements to the DOM
        // dynamically create containers for displaying the class labels
        document.getElementById("webcam-container").appendChild(webcam.canvas);
        labelContainer = document.getElementById("label-container");
        for (let i = 0; i < maxPredictions; i++) { // and class labels
            labelContainer.appendChild(document.createElement("div"));
        }
    }
=> The “loop()” function continuously updates the webcam frame and invokes the “predict()” function to carry out the inference. Inference is the process of using a trained Machine Learning algorithm to make a prediction.
async function loop() {
        webcam.update(); // update the webcam frame
        await predict(); //this line starts the process of "inference" by calling predict() function.
        window.requestAnimationFrame(loop); //loop continuously within this function
    }
=> The process of inference takes place in “predict()” function. In this function, the image captured by the webcam is run through the model to obtain the prediction. The prediction values returned by the model are used for sending a message to server. This message processed at the server(Raspberry Pi) to actuate the GPIO pins. Read the comments to appreciate the working of this function.
async function predict() {

        const prediction = await model.predict(webcam.canvas); //webcam canvas is fed to the model here. Execution halts here untill the model returns the prediction values with respect to the current image. predict can take in an image, video or canvas html element.

       //Now, the constant "prediction" has information of all the classes which includes their labels and associated probabilities. We can read them by running a for loop
        for (let i = 0; i < maxPredictions; i++) {
            const classPrediction = prediction[i].className + ": " + prediction[i].probability.toFixed(4);
            labelContainer.childNodes[i].innerHTML = classPrediction;

          //------------------------------------------------------------------------------------------
          //--------- the code below is added to make use of the predictions returned by the model--------------
          //------------------------------------------------------------------------------------------

          //Only those "if" blocks written below will be executed where the prediction probability exceeds the defined threshold (which is above 0.8/0.9). When the model distinctly identifies a gesture, only one of these "if" blocks will be executed. Because when a gesture is identified, the prediction probability of its corresponding class approaches 1 and at the same time prediction probability of other classes approaches 0.

            if(prediction[i].className=="none" && prediction[i].probability>0.8){

                send_data("stop"); //pass the string "stop" to the server via background ajax calls.

                sleep(delay); //the delay is introduced to reduce the frequency of ajax calls. here delay is 200 milliseconds. That means this "if" block will execute maximum 5 times in a second to send data to server. without this delay, large number of ajax calls could overwhelm the server.

                console.log(prediction[i].className + ": " + prediction[i].probability.toFixed(4)); // only for debugging purpose. just to print these values on the console to monitor javascript execution. You can see that by right clicking a web page and select "inspect element" (for mozilla). For chrome, it is "inspect".
            }

            if(prediction[i].className=="ear left" && prediction[i].probability>0.9){
                sleep(delay);
                send_data("left");
                console.log(prediction[i].className + ": " + prediction[i].probability.toFixed(4));
            }

            if(prediction[i].className=="ear right" && prediction[i].probability>0.9){
                sleep(delay);
                send_data("right");
                console.log(prediction[i].className + ": " + prediction[i].probability.toFixed(4));
            }

            if(prediction[i].className=="left hand" && prediction[i].probability>0.9){
                sleep(delay);
                send_data("forward");
                console.log(prediction[i].className + ": " + prediction[i].probability.toFixed(4));
            }

            if(prediction[i].className=="right hand" && prediction[i].probability>0.9){
                sleep(delay);
                send_data("backward");
                console.log(prediction[i].className + ": " + prediction[i].probability.toFixed(4));
            }
            if(prediction[i].className=="nose" && prediction[i].probability>0.9){
                sleep(delay);
                send_data("light_on");
                console.log(prediction[i].className + ": " + prediction[i].probability.toFixed(4));
            }
            if(prediction[i].className=="mouth" && prediction[i].probability>0.9){
                sleep(2000);
                send_data("speak");
                console.log(prediction[i].className + ": " + prediction[i].probability.toFixed(4));
            }
        }
    }
=> Function “send_data(msg)” simply sends a string to a PHP file in the server via background ajax calls. It requires javascript library “jQuery”.
function send_data(msg){
        console.log(msg); // only for debugging
        $.post("ajax_action.php",{message: msg}); //this line sends the variable "msg" to a php file named "ajax_action.php" residing in the server. The variable is sent through a POST request. This will work only if you have linked "jquery.min.js" script with this html file. You can see the line '<script src="/earthrover/js/jquery.min.js">' in the beginning of this file.
}
=> Function “sleep(milliseconds)” is a javascript utility function used for injecting delay in the flow of execution. It is used for reducing the number of ajax calls made to the server by above function.
//If a delay of 1 second is desired, then set the the value of variable "milliseconds" as 1000.
function sleep(milliseconds) {
        var start = new Date().getTime();
        for (var i = 0; i < 1e7; i++) {
            if ((new Date().getTime() - start) > milliseconds){
                break;
            }
        }
}
Download the Code
All the contents of the directory ‘tm’ along with supporting files can be downloaded through this link 
Deploy the model on Raspberry Pi
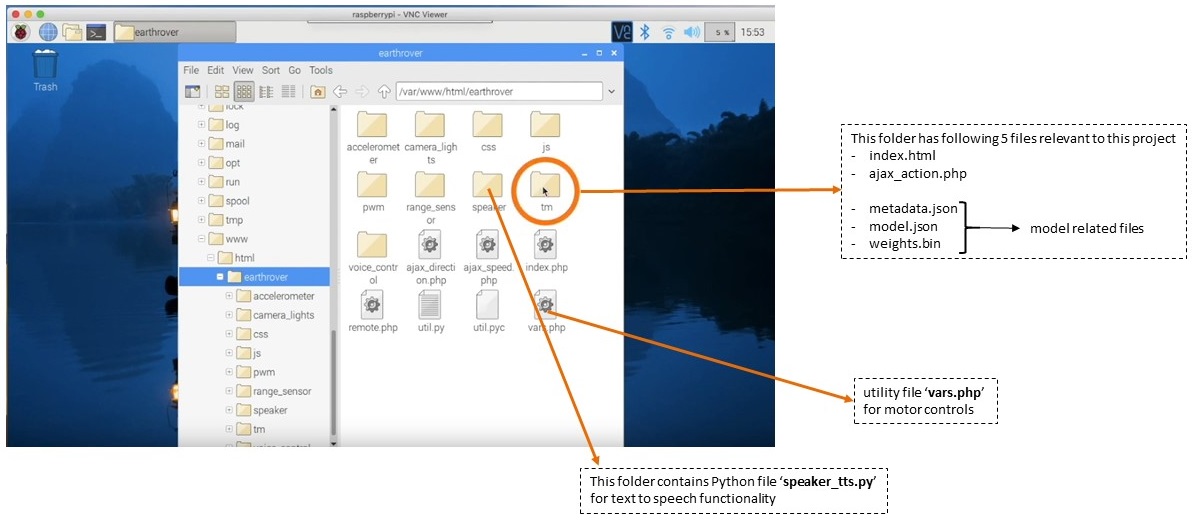
So far we have prepared a directory named ‘tm’ with all the requisite files. Now it is time to deploy this directory in a Webserver running on Raspberry Pi. If you download the complete project through github, you will find the directory ‘tm’ inside another directory named ‘earthrover’ which contains utility files such as ‘vars.php'(contains motor control logic) and ‘speaker_tts.py’ (contains text to speech logic). Place the directory ‘earthrover’ in Raspberry Pi as shown in the pic below. Notice the path of the directory in Raspberry Pi.
Now, using a laptop or a PC (with a webcam) open up a browser and type the URL pointing the folder ‘tm’. Ensure that the laptop and Raspberry Pi are connected to the same wifi LAN and Webserver is running on the Raspberry Pi.
In my case, this URL is http://92.168.1.20/earthrover/tm. The IP address ‘192.168.1.20’ will be different, depending upon the LAN configuration of your wifi router. This URL will produce a web page as shown in the picture below. Notice that the web page generated locally through Raspberry Pi is almost similar to the preview section of the Teachable Machine web page, barring the visual representation of the classes.
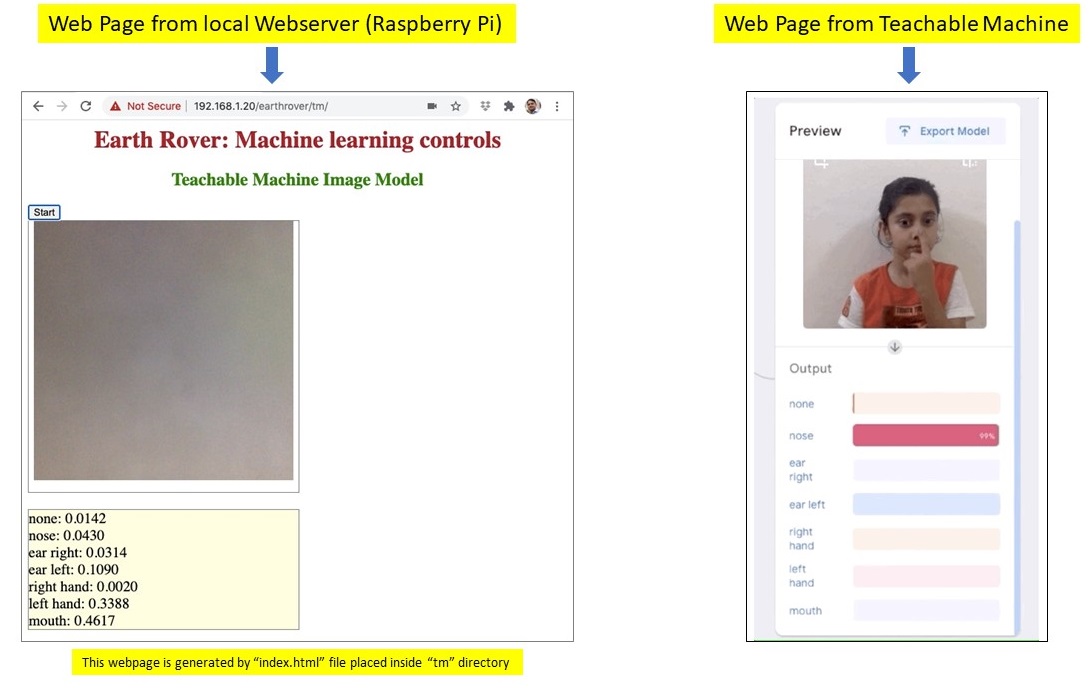
The web page shown above is generated through local Webserver. It is fully equipped with all the javascript functions to perform tasks such as capturing data through webcam, performing inference using the ML model existing locally in the Raspberry Pi and display predictions received from the model.
On the press of start button, the whole process swings into action and allows control of the robot through human gestures.
If you have any queries, let me know in the comments below.
Hi,
I want to use Python, but I have Problems running the model in Tensorflow and Tensorflow-lite.
The Tensorflow.js model is running great on browser.
Can I translate this code in Python? Or import only the detected label (result) in a Python code?
Thanks a lot,
Best Regards
Fabrizio
best coder ever