Updated in September 2026 for Raspberry Pi OS 13 (Trixie). The project is now part of the robotics-level-4 repository and installs with a single script, and the code in this article matches that repository. The approach is the same as in 2020; what changed is how the camera is opened, how the Coral is found, and where things are installed.
In the previous article we saw how to integrate Coral USB Accelerator with Raspberry Pi to speed up the inferencing process while using a Machine Learning Model with TensorFlow Lite interpreter. In this project, I have used the same Coral device with Raspberry Pi Robot to implement Object Detection. The robot can do following tasks:-
- Detect objects in the camera frame and overlay the frame with text information and bounding boxes around objects.
- Stream the video frames over LAN to a browser. The output is viewed remotely on a Web Control Panel (or Web GUI).
- Web Control Panel can provide commands to manoeuvre the robot and monitor a particular object. When the selected object is detected in the frame, the Web control panel turns orange to provide visual alert and the object counter is incremented.
A demo version of the Web GUI is hosted on this server. You can interact with it to appreciate its functionality. The Web GUI looks like this:-
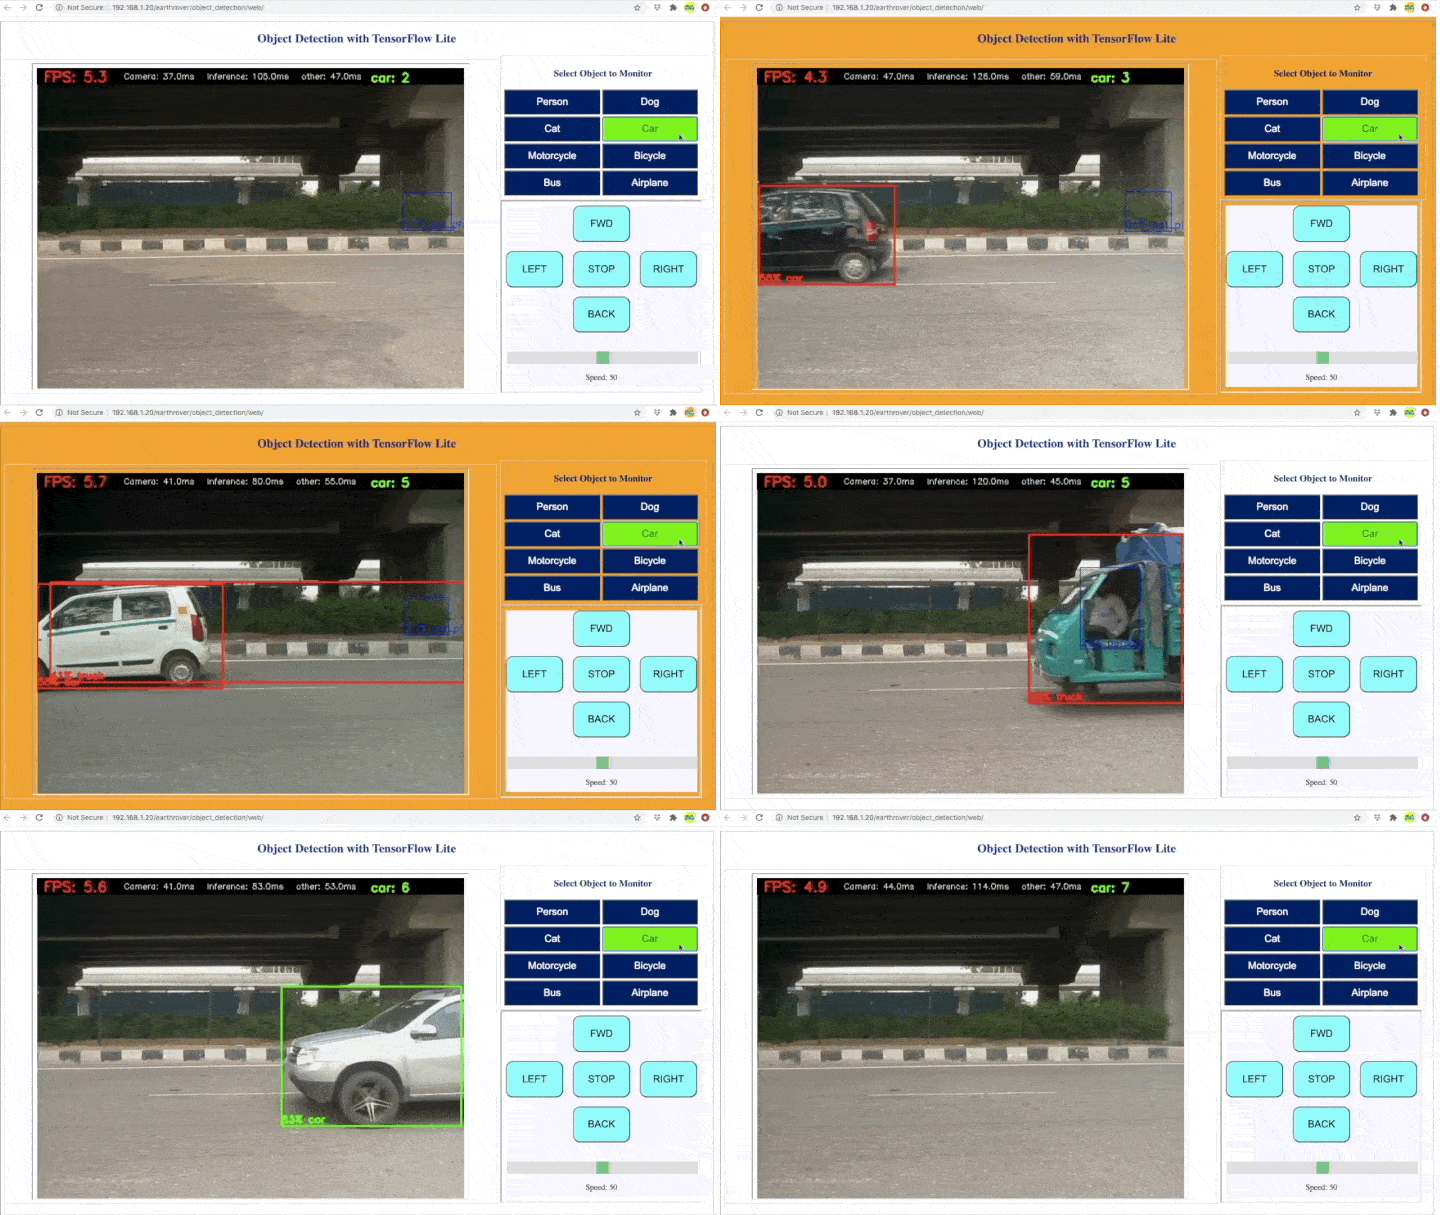
In the above ‘Object Detection’ example, the robot is set to observe cars. When a car is detected in the frame, the Web GUI turns orange to show the presence of a car. Similarly, the robot can be configured to monitor any of the 90 objects provided by the Machine Learning model. The details of the hardware and software components used in the project is as follows:-
| Raspberry Pi 3A+ | The main computer of the Robot |
| Coral USB Accelerator | Optional hardware to speed up the inferencing process. It is detected automatically, and the same code runs on the CPU without it |
| Pi Camera or USB webcam | The Raspberry Pi camera board on its ribbon cable, or any USB webcam |
| MobileNet SSD v2 (COCO) | Machine Learning Model which can detect the location of 90 types of objects in a picture |
| LiteRT (ai-edge-litert) | Python APIs for on-device machine learning inference — the successor to the TensorFlow Lite runtime |
| OpenCV | Computer Vision library used for drawing the overlays on the frame and encoding it for the stream |
| FLASK | It is Python’s micro web framework. Used for Streaming the output of OpenCV over LAN |
| PHP, Javascript, HTML | Used for Generation of Web UI for controlling the robot and displaying Streaming output |
The project is carried out in a step by step manner and divided into three sequential stages as mentioned below:-
Stage 1: Implement Object Detection on Raspberry Pi and check the results in the terminal.
Stage 2: Integrate FLASK with the Object Detection code to stream output over LAN.
Stage 3: Integrate the streaming output with Web Control Panel of Robot
The code is in the earthrover/object_detection folder of the robotics-level-4 repository, and is installed along with the rest of the robot by one script — the steps are in Replicate Earthrover Robot Software on your Raspberry Pi. Once installed, the robot’s control panel starts it from the AI Robotics row. Each of the above stages has a separate Python file associated with it. The next stage is built upon the previous stage, incorporating additional features.The details of these stages in brought out in succeeding paragraphs.
Stage 1: Implement Object Detection on Raspberry Pi and check the results in the terminal
The code developed for this stage is present in the file named “object_detection.py” and meets following objectives:-
1. Object Detection with color coded bounding boxes around the objects based on the confidence score.
2. Draw information bar on top of the output window to show FPS, Processing duration and Object Counter.
3. Counter gets updated upon finding ‘Person’ in the frame. The label ‘Person’ is hardcoded in this stage.
4. Print the time taken by each step, and the FPS, in the terminal.
The 2020 version of this stage opened a window on the Pi’s desktop. The current code uses the headless build of OpenCV, which has no windows, so the frame with its overlays is first seen in Stage 2, in a browser.
=>The code begins with import statements followed by defining some control parameters.
import camera_compat
cap = camera_compat.VideoCapture(0)
threshold=0.2
top_k=10 #number of objects to be shown as detected
camera_compat is a small module in the repository. On Raspberry Pi OS Bookworm and Trixie, OpenCV’s VideoCapture can no longer read the ribbon camera, because /dev/video0 now delivers raw sensor data. camera_compat picks what works instead: picamera2 for the ribbon camera, V4L2 for a USB webcam. Either way the loop below receives ordinary frames, already turned the right way up according to the orientation set in config.txt. threshold is the minimum confidence score for an object to count as detected, and top_k the most objects shown at once.
=>The location of Models and corresponding Label file. The code selects one of these models to load: ‘model_edgetpu’ is compiled for the Coral USB Accelerator and runs only on it, while ‘model’ runs on the CPU. The installer places them in /var/www/html/all_models.
model_dir = '/var/www/html/all_models'
model = 'mobilenet_ssd_v2_coco_quant_postprocess.tflite'
model_edgetpu = 'mobilenet_ssd_v2_coco_quant_postprocess_edgetpu.tflite'
lbl = 'coco_labels.txt'
=> These global variables are used for counting the number of appearances of an object. In this stage, the object is fixed as ‘person’. This part is covered later in this article.
counter=0
prev_val=0
selected_obj="person"
=> The main function starts with making interpreter and then loops forever performing the 3 tasks as shown below. The function ‘load_model()’ is defined in the ‘common1.py’ file which is imported in the begining of the code. This function takes 04 parameters i.e. path the directory containing the model & label files, name of model file, name of label file and boolean value which decides whether to make an interpreter with edgetpu or without it.
That value, edgetpu, is no longer typed into the script. It comes from util.py, which looks for the Coral on the USB bus and checks that its library is installed, so the same code runs with or without the accelerator. To force one or the other, start the script with EARTHROVER_EDGETPU=0 for the CPU or EARTHROVER_EDGETPU=1 for the Coral. Installing the Coral library on current Raspberry Pi OS is covered in the Coral article.
def main():
    from util import edgetpu

    if (edgetpu==1):
        mdl = model_edgetpu
    else:
         mdl = model

    interpreter, labels =cm.load_model(model_dir,mdl,lbl,edgetpu)

    fps=1
    arr_dur=[0,0,0]
    while True:
        start_time=time.time()

        #----------------Capture Camera Frame-----------------

        #-------------------Inference---------------------------------

        #-----------------other------------------------------------

    cap.release()
The logic inside the ‘while’ loop is mapped with actual code in picture below.
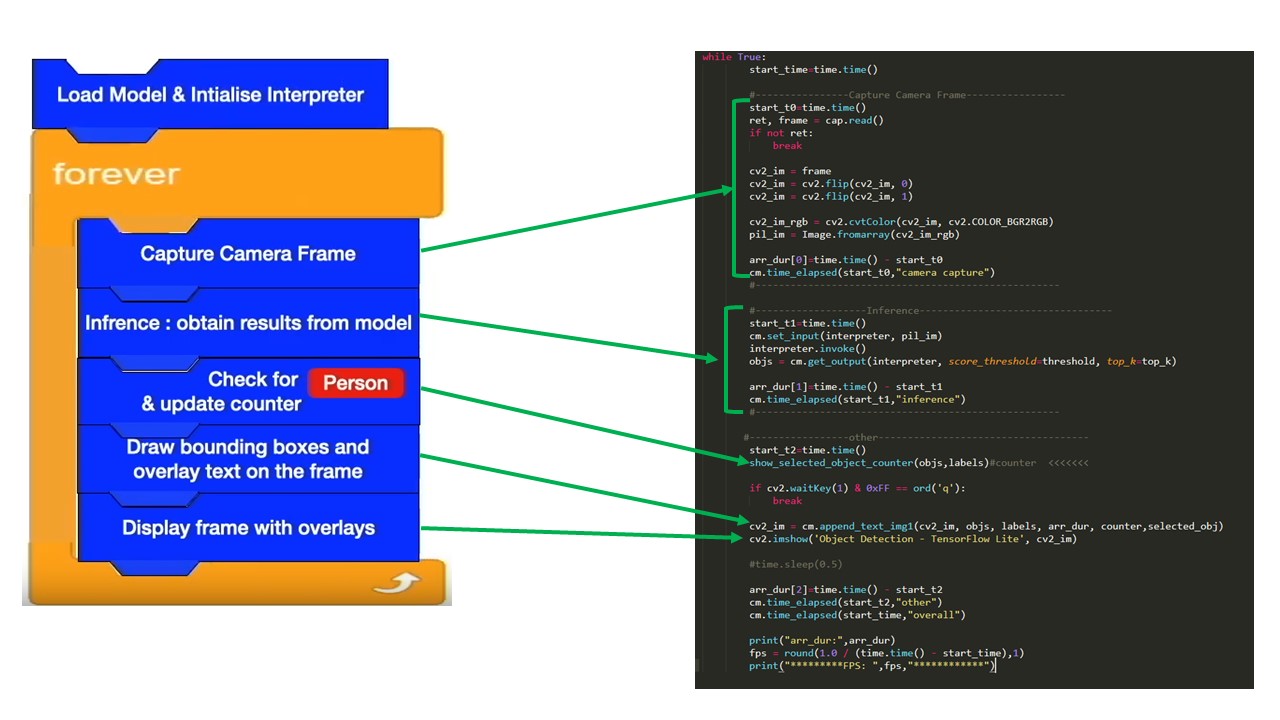
As seen in the picture above, the camera frame is captured and converted into a format required by the model. (The picture shows the 2020 version of the loop, which also flipped every frame; the orientation is now applied once, when the camera opens.) The frame is fed to the model using ‘set_input()’ function. The output of the model is a list of objects present in the frame along with the associated parameters. the working of Object Detection is shown in the picture below.
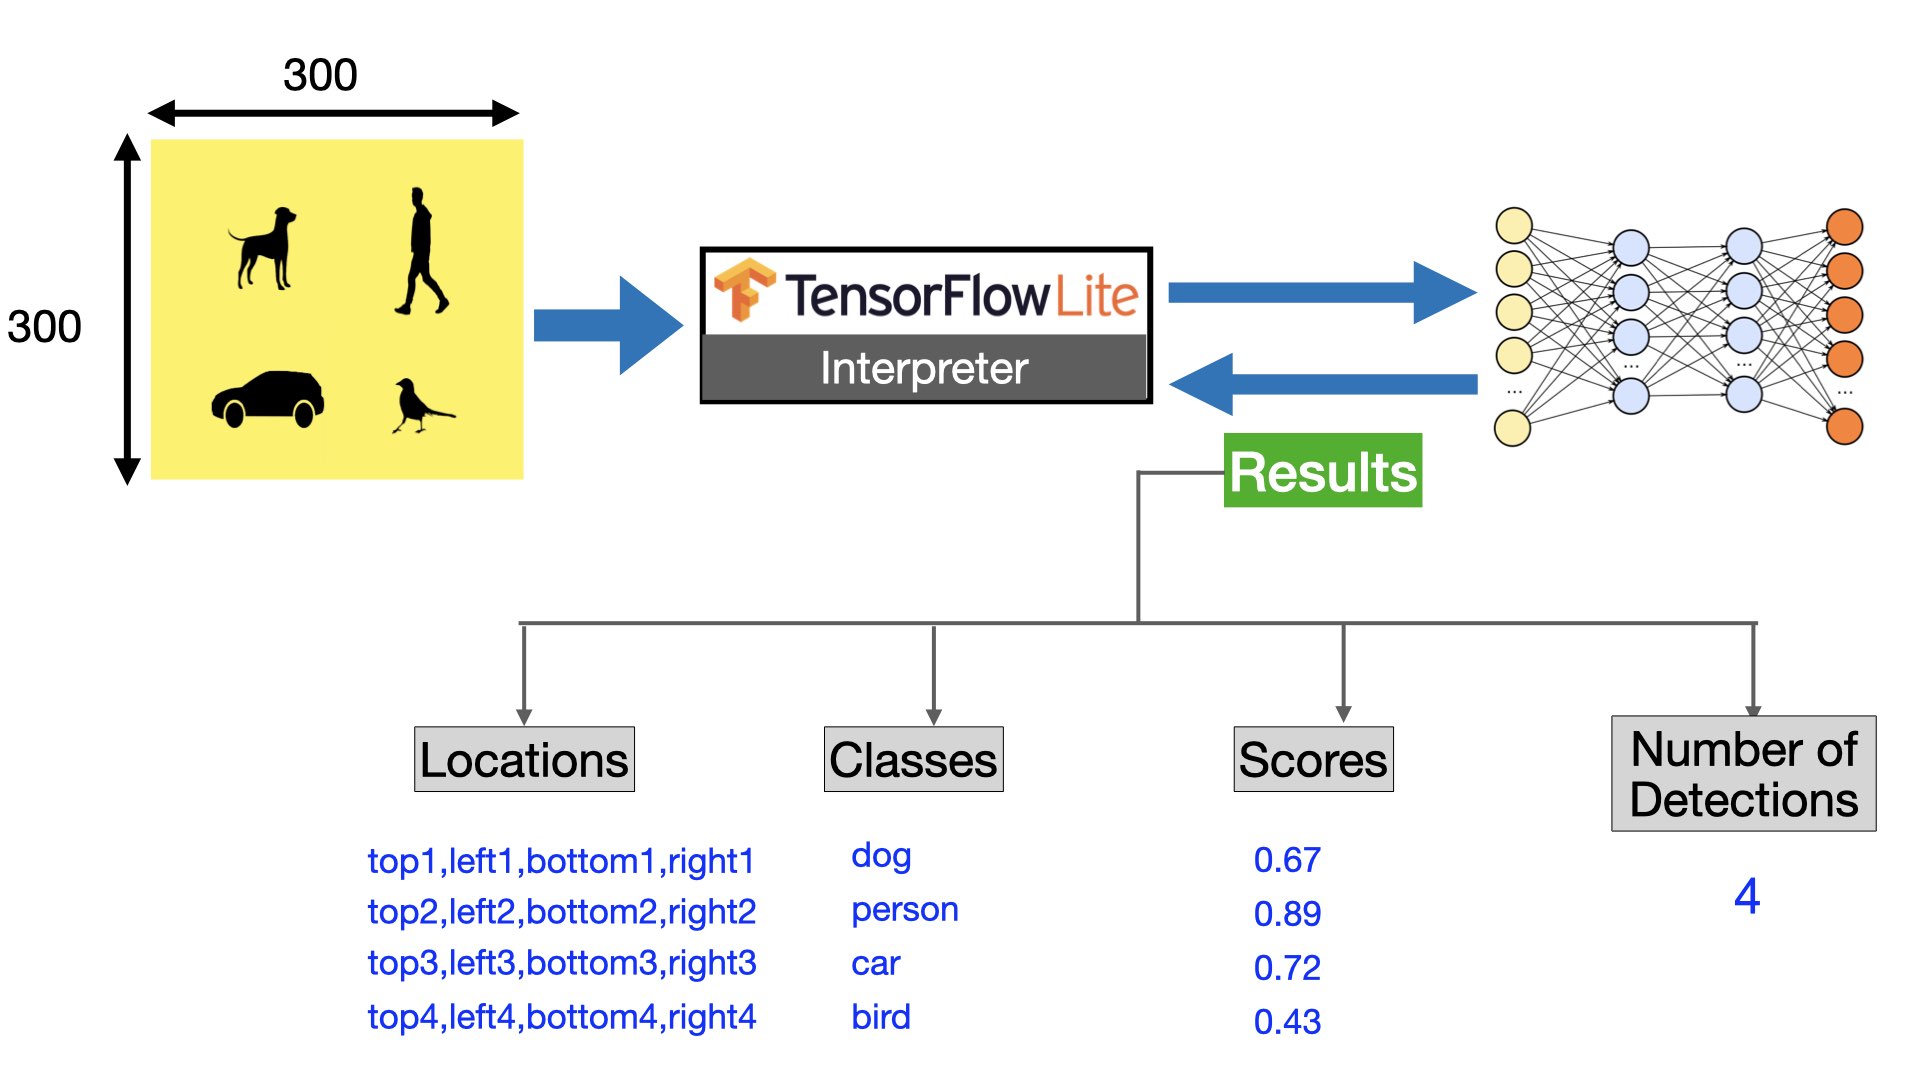
The Object Detection model returns Location, Class and Confidence score with respect to each detected object in the frame. This information is used as follows:-
(a) Location: Coordinates of an object i.e. (top, left) and (bottom, right) are used for drawing the bounding boxes around the object
(b) Class: Name of the class is displayed along with the bounding box. Also, the class name is compared with pre-defined label to check its presence in the frame. If the object with pre-defined class is present then a counter is updated. This logic is implemented in function ‘show_selected_object_counter()’ described below. This is an elementary logic to make an object counter which can be further improved.
def show_selected_object_counter(objs,labels):
    global counter, prev_val, selected_obj
    arr=[]

#loop through all the objects and store the label value in an array
    for obj in objs:
        #print(obj.id)
        label = labels.get(obj.id, obj.id)
        #print(label)
        arr.append(label)

    print("arr:",arr)

#count the number of occurrences of 'selected_obj' which is 'person' . if 'person' is present then variable 'x' will have a non zero value indicating no of person present in the frame.
    x = arr.count(selected_obj)

#this step checks weather the count i.e. 'x' has with respect to previous frame. If there is an increase in the difference value,
#that means another person has appeared in the current frame and the counter needs to be updated. If there is decrease,
#that means the person present in the previous frame has left and there is no need to update the counter.

    diff=x - prev_val

    print("diff:",diff)
    if(diff>0):
        counter=counter + diff

    prev_val = x

    print("counter:",counter)
(c) Score: This value indicates the confidence level of the model while classifying an object under a specific class. This value is used for color coding the bounding boxes.
=> The processing time involved in each section inside the ‘while’ loop is measured and collected in an array ‘arr_dur’. So at the end of each iteration the array variable ‘arr_dur’ is updated with the time taken by Camera Capture, Inference and balance code (other). This variable along with other variables such as objects in frame, labels, counter value and label to be monitored are passed to a function ‘append_text_img1()’ to draw overlays on the frame. The various overlays on the frame are matched with the respective code in the picture below.
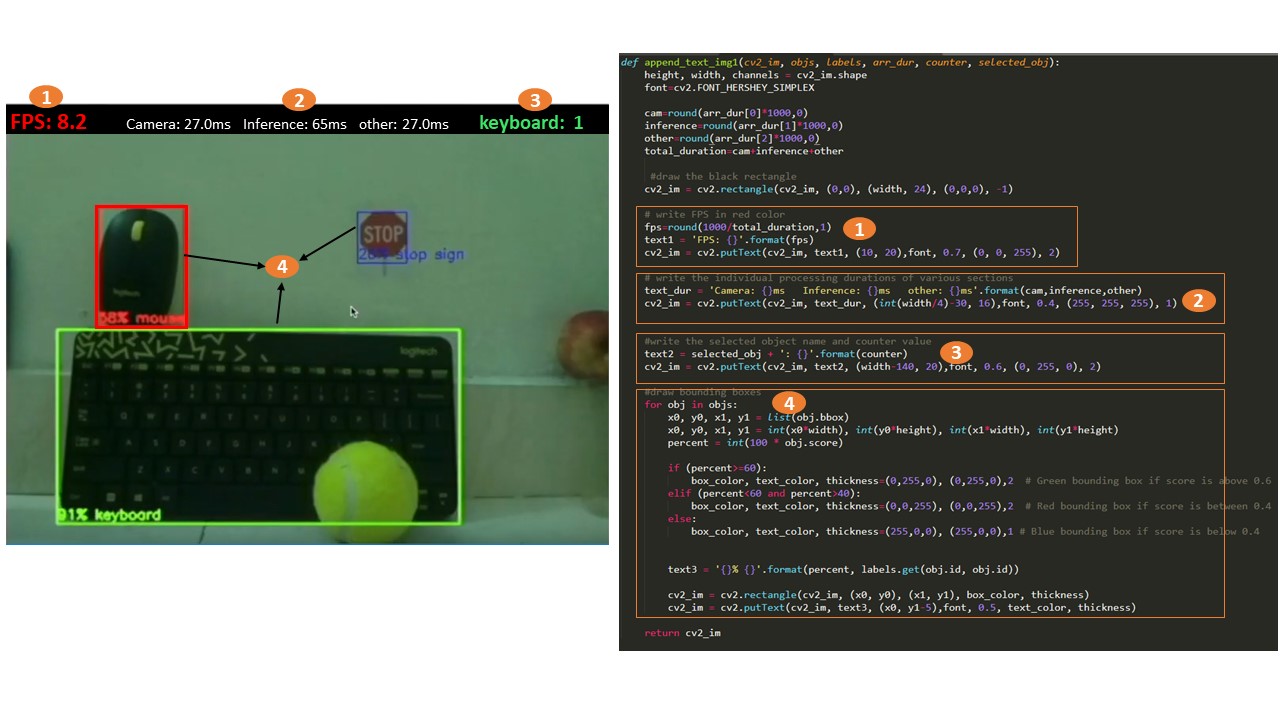
When the above code is run, the terminal shows the time taken by capture, inference and the rest of each frame, and the FPS — the numbers to watch when comparing the CPU with the Coral.
Stage 2: Integrate FLASK with the Object Detection code to stream output over LAN
The code developed for this stage is present in the file named ‘object_detection_web1.py‘. This file is completely similar to ‘object_detection.py‘ file of previous stage except the output rendering part.
Here the frame with its overlays is viewed on a web page, by providing the IP address and port of the Raspberry Pi. This streaming of output is achieved by integrating FLASK in the application.
FLASK is a micro web framework that allows streaming of the frames captured by the camera over LAN. In just few lines of additional code, you can embed this feature in your own application. The modifications are explained below.
We start with importing necessary modules of FLASK and creating a object. The route() function of the Flask class tells the application which URL should call the associated function.
Instead of writing HTML code within a function, we can render a HTML file by using the render_template() function. Flask will try to find the HTML file in the ‘templates’ folder, which needs to be present in the same folder in which this script is present. You can see this folder and its contents in the code directory.
from flask import Flask, Response
from flask import render_template

app = Flask(__name__)

@app.route('/')
def index():
    #return "Default Message"
    return render_template("index1.html")

@app.route('/video_feed')
def video_feed():
    #global cap
    return Response(main(),
                    mimetype='multipart/x-mixed-replace; boundary=frame')
The output of ‘video_feed()’ is live camera frames with overlays, encoded as a bytes inside ‘main()’ function. The function is called within the html file ‘index1.html‘ as shown below.
<html>
  <head>
    <title>FLASK Stream</title>
  </head>
  <body>
    <h1 align='center' style='color:brown'>FLASK Web Streaming</h1>
    <img src="{{ url_for('video_feed') }}" width='80%'>
  </body>
</html>
Now, inside the ‘while’ loop of the ‘main()’ function, we simply change the rendering mechanism of the camera frames. The ‘cv2.imshow()’ function has been commented out and the output is streamed through yield() function of flask as shown below.
 #cv2.imshow('Object Detection - TensorFlow Lite', cv2_im)

ret, jpeg = cv2.imencode('.jpg', cv2_im) #Encode the frame as a JPEG image.  JPEG compression helps in faster transmission of frames and reduces network load.

pic = jpeg.tobytes()

 #Stream the encoded JPEG frame that can be consumed by a web browser.
yield (b'--frame\r\n'
       b'Content-Type: image/jpeg\r\n\r\n' + pic + b'\r\n\r\n')
The Flask application is started by calling the run() method. The parameter hostname is set to ‘0.0.0.0’ to make server available externally. This function is called at the beginning of the code as shown below.
if __name__ == '__main__':
    app.run(host='0.0.0.0', port=2204, threaded=True) # Run FLASK
    main()
Now when the ‘object_detection_web1.py‘ file is run through terminal, following message is displayed.
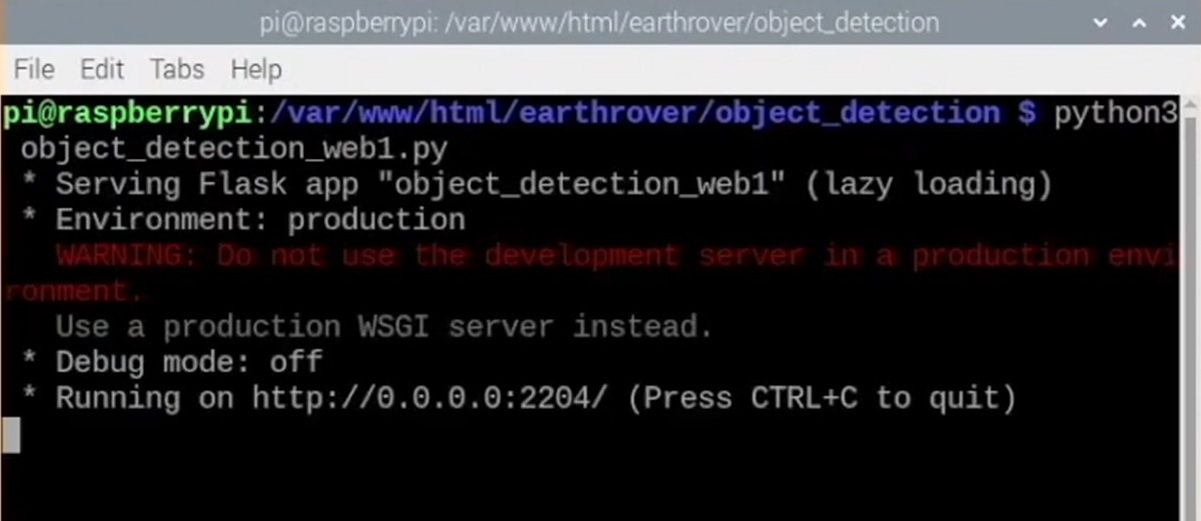
Just type the IP address of Raspberry Pi set as per your LAN IP scheme in the browser followed by port to start the streaming.
Stage 3: Integrate the streaming object detection output with Web Control Panel of Robot
This stage involves creation of dynamic web page that is capable of embedding streaming output generated through FLASK and also providing commands for controlling the rover. The PHP code is placed in a folder named ‘web’ inside the code folder. The various sections of the UI are matched with the respective code in the picture below.
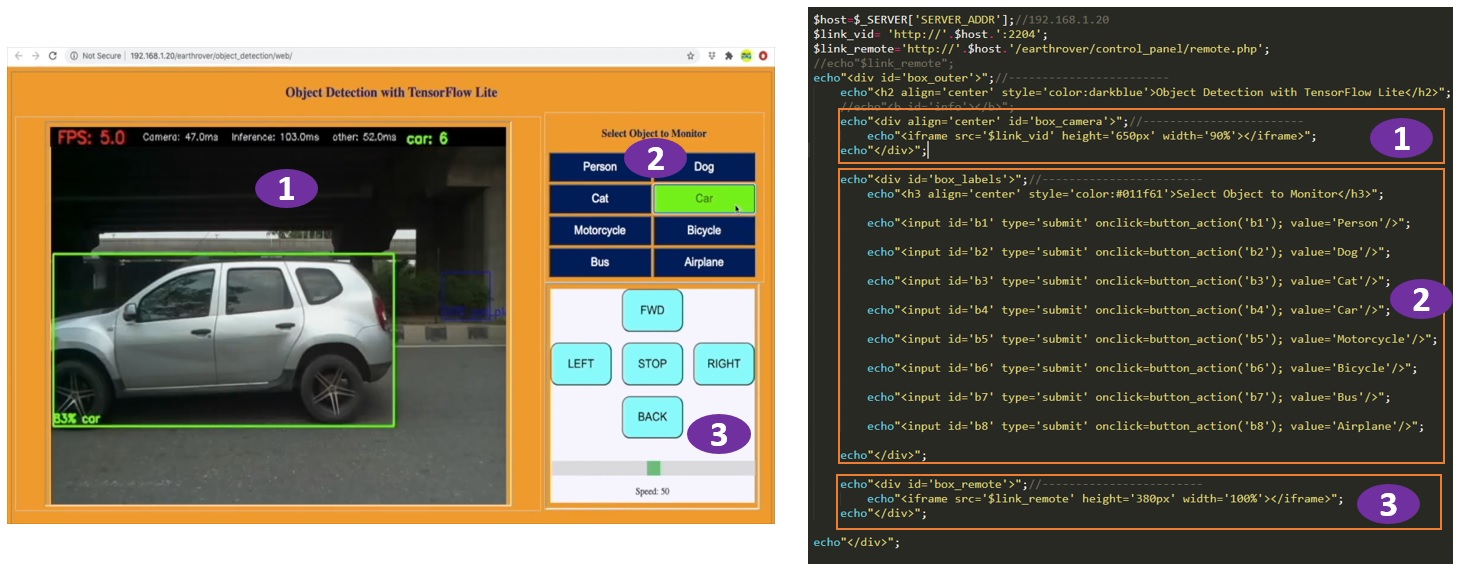
As you can see, there are 3 sections in the Web GUI. The details are as follows:-
(a) Section 1 : This section contains the output streamed. The web page ‘index2.html‘ generated through FLASK is displayed using the <iframe> tag.
(b) Section 2: This section has few buttons with object names on them. When a button is pressed, a javascript function associated with it is invoked. This function simply sends the name of the selected object to server. A PHP file ‘object_cmd.php‘ in the server receives this name and writes to a txt file ‘object_cmd.txt‘.
(c) Section 3: This section re-uses the code written previously for controlling the robot direction and speed. A file name ‘remote.php’ is displayed within <iframe> tag.
In addition to creating the Web GUI, a python file ‘object_detection_web2.py‘ is also created for this stage. The file has minor modifications compared to previous stage. Instead of hard-coding the value of selected object, it is read from ‘object_cmd.txt‘ file inside the ‘show_selected_object_counter()‘ function. Also, the number of occurrences of the selected object are written to another file called ‘object_found.txt‘. Value present in this file is fetched every 600 millisecond by the browser through a javascript function. If the value is non zero, then the background color of the Webpage is changed to orange to indicate the presence of the selected object in the frame.
#read the object name from the txt file
f0 = open(file_path + "object_cmd.txt", "r+")
selected_obj = f0.read(20);
f0.close()

#if the new object is selected, reset the counter
if(selected_obj!=prev_val_obj):
    counter=0

prev_val_obj=selected_obj

print("selected_obj: ",selected_obj)

#write down the value of 'x' to a file. This value indicates the number of occurrences of selected object in the frame.
x = arr.count(selected_obj)
f1 = open(file_path + "object_found.txt", "w")
f1.write(str(x))
f1.close()

if(x>0):#selected object present in frame. Make GPIO pin high
    ut.camera_light("ON")
else:#selected object absent in frame. Make GPIO pin Low
    ut.camera_light("OFF")
So two things happen while the chosen object is in view: the page turns orange, and the robot’s camera light switches on — the last four lines above.
In the control panel, Object Detection in the AI Robotics row starts ‘object_detection_web2.py‘. Only one program can hold the camera, so the ordinary camera view goes off while detection runs, and the panel waits until the stream is really up before showing it. It also refuses to start while collision avoidance is on, because both need the motor pins.
How fast it runs today
Measured on the robot itself — a Raspberry Pi 3A+ on Raspberry Pi OS 13, running the MobileNet SSD v2 model:
| CPU | Coral USB Accelerator | |
| Inference per frame | 229.5 ms | 47.6 ms |
| Frames per second, end to end | 3.6 | 9.6 to 12.3 |
The Pi 3A+ has USB 2.0 only, which holds the Coral back — the same accelerator on a Pi 4 is considerably faster. On a board with 512 MB of memory like the 3A+, turn the desktop off: with it running, the detector ends up in swap and manages about 0.1 FPS instead of 10. The repository’s README shows how.
The techniques applied in this Object Detection project show how you can merge various opensource software modules to create your own use case. In this project we saw merging of Python’s on-device Machine Learning APIs with Web framework FLASK. Finally we integrated the whole solution with a Web Application that can be used to remotely monitor and control the behaviour of Python scripts.
May I ask what is the usage of line 24 in the object_detection_web1.py ?
sys.path.insert(0, ‘/var/www/html/earthrover’)
same question about the line 30
model_dir = ‘/var/www/html/all_models’
what is the version of numpy used in this project
don’t remember. Just go for the latest one
can you please say what version of numpy was used in this project
is it possible to control the web through the internet?
Yes. One way is, configure a static public IP on your home wifi router for internet. Then carry out Port Forwarding to access your raspberry pi Webserver from outside
thanks for the reply sir. Exactly I was thinking about port forwarding method
Hello,
Cn I use a webcam instead of the PI camera?
Yes you can. Plug in the webcam and change the ‘0’ in this line to ‘1’ or ‘2’ . It will work in one of these values.
cap = cv2.VideoCapture(0)
Thanks for the quick reply.
I just wanted to know if I install Tensorflow Lite or OpenCV ?
You have to install both TFLite & OpenCV
Thank you for this project, ??
but can you show me how to install OpenCV and Tensorflow or what version to install?
Send me your email address, I will give you a shell file with all the relevant commands in order
ha52490432@gmail.com