MQTT (Message Queuing Telemetry Transport) is a popular protocol for creating IOT applications. Anyone who has ventured in the world of IOT would have definitely heard about it. It is popular because it is lightweight and provides an effective way to exchange data between multiple devices even in a constrained low bandwidth environment.
Devices can send and receive data through a MQTT broker. The broker does not store / modify / generate any data. It only relays the messages between various devices which are connected to it. Devices communicate with each other using a publish and subscribe system. Messages can be published on a specific topic by a device. The devices that are subscribed to that topic can receive the message.
In this project, you will learn how to setup such a communication between a Raspberry Pi and ESP32 devices. Once you have grasped the concept, you can scale up this setup by adding more ESP32 or Raspberry Pi clients .
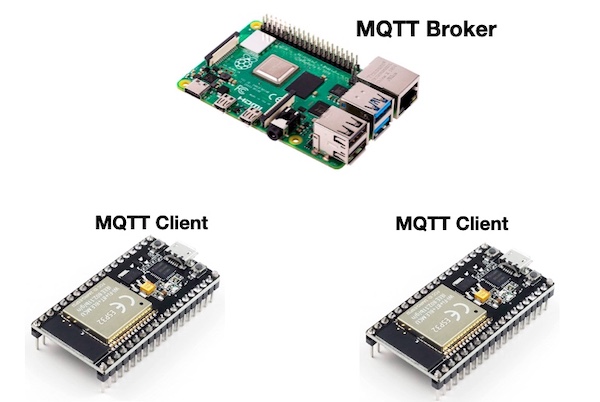
Installation and working of MQTT can be tested with a single PC only. However, to experience the real world data flow between various embedded devices, I will demonstrate the working of MQTT network by using the devices shown in picture above. The source code used in this project is available on this Github link. This code can become the foundation of your next home automation / IOT or Robotics project.
Installing MQTT
First of all we need a machine which can run the broker (also called MQTT Server). Raspberry Pi is a good choice to perform this task. It consumes low power and can run for days/months without any performance degradation. I am going to use “Mosquitto” as MQTT broker. It can be installed easily on Raspberry Pi OS or any other Linux machine. Use the following commands to install Mosquitto:-
sudo apt install -y mosquitto
sudo apt install -y mosquitto-clients
In order to write Python scripts that can connect to the broker as clients, you need to install paho-mqtt.
sudo pip3 install paho-mqttIf pip3 is not already installed, you can install it by following command.
sudo apt install python3-pipCheck the status of Mosquitto service
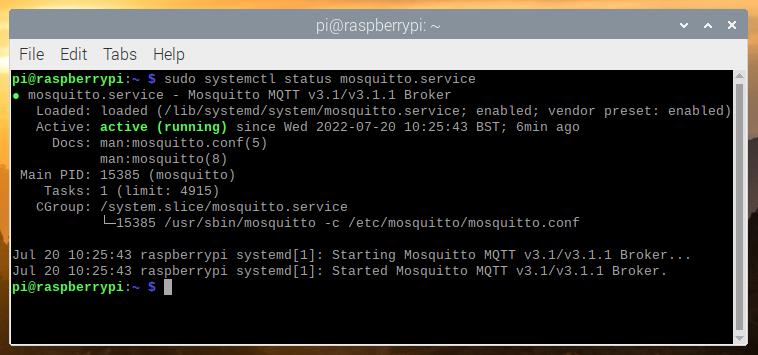
You can start, stop or restart the service using following commands:-
sudo systemctl start mosquitto.service

sudo systemctl stop mosquitto.service

sudo systemctl restart mosquitto.service
You are now all set to create the MQTT clients. These clients are nothing but programs written in Python or C or any other language that can connect to MQTT broker.
Scope of the project
To keep things simple, I created an information flow between these devices which can be summarised by the diagram shown below.
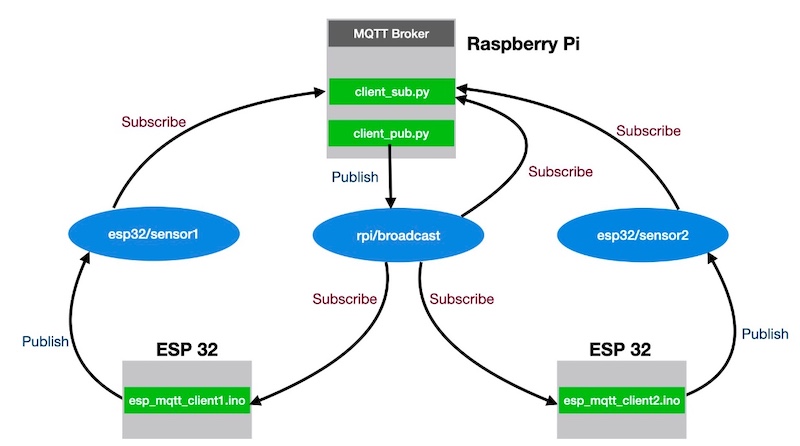
You can notice that Raspberry Pi is running the MQTT broker and has two client python scripts (client_sub.py & client_pub.py). The two ESP32 devices run their individual C codes (clients). The communication flow between these clients is facilitated through ‘topics’ shown in blue background. The inward arrow to the topic means that a client is publishing information on this topic. The outward arrow from a topic leads to the client who has subscribed to the topic and consumes the published information.
No sensor is required to be interfaced for this project. The idea is to demonstrate the data flow, which is achieved by sending dummy values. To achieve this flow, we need to create programs for each device. Lets see what is the purpose of each program.
Raspberry Pi Client Code
There are two Python scripts. Both of them connect to the MQTT broker (running in Raspberry Pi itself) as client. The purpose of these scripts is described below.
client_sub.py
Task: Connect to broker and keep receiving data from other clients by subscribing to all the topics. Print the received data on terminal.
This script starts with relevant import statements.
import paho.mqtt.client as mqtt
import time
We create an MQTT client object called ‘client’ and a flag to monitor its connectivity status with broker. This flag is set and reset inside on_connect and on_disconnect functions.
client = mqtt.Client("rpi_client1") #this should be a unique name
flag_connected = 0 #flag to monitor if the client is connected to MQTT broker or not

client.on_connect = on_connect #this function is called when the client gets connected to the MQTT broker
client.on_disconnect = on_disconnect #this function is called when the client gets disconnected from the MQTT broker
Then we use the ‘client’ object to use it to define various callback functions. Every callback function corresponds to a particular topic. When a message is received on a topic, its corresponding callback function is invoked automatically. For example ‘callback_esp32_sensor1’ function will be invoked automatically when the data arrives on topic ‘esp32/sensor1’. We just need to wirte our logic inside that function. Similarly, we create callback functions for all the topics from which data is desired.
client.message_callback_add('esp32/sensor1', callback_esp32_sensor1)
client.message_callback_add('esp32/sensor2', callback_esp32_sensor2)
client.message_callback_add('rpi/broadcast', callback_rpi_broadcast)
Connect to the broker by specifying its IP address & Port in the ‘connect’ function. Here, the IP address belongs to localhost. That means the client is running on the same machine as the MQTT broker. Now, start the client activity in a background thread and subscribe to the relevant topics.
The loop_start() method creates a thread and begins monitoring for the messages in the background. It also automatically checks connectivity with MQTT broker. In case there is a break in connectivity due to any reason, this function attempts to reconnect the broker automatically.
client.connect('127.0.0.1',1883) #1883 is default port of MQTT broker.
# start a new thread
client.loop_start()
client_subscriptions(client) #subscribe to desired topics
print("......client setup complete............")
The following function contains the list of topics that are subscribed by this script. These are “esp32/#” and “rpi/broadcast”. A hash after ‘esp/’ indicates that any topic with ‘esp/’ will be subscribed. Now, the data published on these topics will be received by this script.
def client_subscriptions(client):
    client.subscribe("esp32/#") # hash indicates all topics followed by 'esp/'
    client.subscribe("rpi/broadcast")
Other function definitions can be referred in the code provided with this article. For this demo project, the callback functions are only used for printing the received values on terminal. You can extend these definitions and use this data for further processing as desired in your project.
client_pub.py
Task: Connect to broker and keep publishing sample data on a topic ‘rpi/broadcast’ every 2 seconds.
This script starts with same import statements, connects to broker (running on same machine) and starts the background activity. This script is not meant to receive any data. Therefore, we do not subscribe to any topic and there is no need to define any callback function. The ‘on_publish’ function is invoked when a message is published by the script.
client = mqtt.Client("rpi_client2") #this name should be unique
client.on_publish = on_publish
client.connect('127.0.0.1',1883)
# start a new thread
client.loop_start()
The script loops forever in a while loop and publishes a message every 2 seconds on the topic ‘rpi/broadcast’. The message is a simple counter which gets incremented by one during every loop iteration till it reaches a certain value and starts over again.
k=0
while True:
    k=k+1
    if(k>20):
        k=1

    try:
        msg =str(k)
        pubMsg = client.publish(
            topic='rpi/broadcast',
            payload=msg.encode('utf-8'),
            qos=0,
        )
        pubMsg.wait_for_publish()
        print(pubMsg.is_published())

    except Exception as e:
        print(e)

    time.sleep(2)
The script also auto connect to server in case the connection is broken.
ESP32 Client Code
Task for ESP 1: Connect to broker and keep receiving data from ‘rpi/broadcast’ topic. Blink the LED when a value ’10’ is received on the topic. Publish sample sensor data on topic ‘esp32/sensor1’ every 4 seconds.
Task for ESP 2: Connect to broker and keep receiving data from ‘rpi/broadcast’ topic. Blink the LED when a value ’15’ is received on the topic. Publish sample sensor data on topic ‘esp32/sensor2’ every 4 seconds.
The code for ESP32 is written using Arduino IDE. Both ESPs run an identical code. The only difference is the name of the client while connecting to the MQTT server and the topic name to which they publish the data. A typical C program written for Arduino / ESP contains a ‘setup()’ and a ‘loop()’ function. Rest of the code can be traced by examining these two functions.
You need to install a pubsubclient library to compile this code. The library contains utility functions to perform task such as connecting to a MQTT server, publish /subscribe to topics. Download the zip file, extract it, rename it to ‘pubsubclient’ and move it to libraries folder of Arduino IDE.
The code begins by including two libraries. WiFi library is needed to connect the ESP32 to a wifi router as a network client and PubSubClient library is required to connect to a MQTT broker available on the network.
#include "WiFi.h"
#include "PubSubClient.h"
Following details are specific to your environment, update these details.
// Replace the SSID/Password details as per your wifi router
const char* ssid = "yourSSID";
const char* password = "yourPassword";

// Replace your MQTT Broker IP address here:
const char* mqtt_server = "192.168.1.45";
Create an object for performing MQTT related tasks. There is a built-in LED in ESP32 which is connected to pin 2. Since there is no display attached to ESP32, we can use this LED to indicate some important states. I have used it to monitor connectivity status of wifi and broker.
WiFiClient espClient;
PubSubClient client(espClient);

#define ledPin 2 //built-in LED of ESP32

long lastMsg = 0;
Now, lets examine the setup() function. Here we set the built-in LED pin as output pin and setup communication with Serial Monitor (provided with Arduino IDE). Serial Monitor is a very useful tool to check the code functionality during run time. Next, we connect to WIFI router and provide MQTT broker address & Port. Also, set a callback function named ‘callback’ for handling all the incoming messages on subscribed topics.
void setup() {
  pinMode(ledPin, OUTPUT);
  Serial.begin(115200);

  setup_wifi();
  client.setServer(mqtt_server,1883);//1883 is the default port for MQTT server
  client.setCallback(callback);
}
The loop() function, as the name suggests, continuously loops and checks for connectivity of client with MQTT broker. If, not connected, it automatically connects it to the broker and then start listening for incoming messages. Every 4 seconds, it publishes a dummy value ’88’ to a topic called ‘esp32/sensor1’.
void loop() {

  if (!client.connected()) {
    connect_mqttServer();
  }

  client.loop();

  long now = millis();
  if (now - lastMsg > 4000) {
    lastMsg = now;

    client.publish("esp32/sensor1", "88"); //topic name (to which this ESP32 publishes its data). 88 is the dummy value.

  }

}
Tasks such as connecting to the MQTT broker and subscribing to topics takes place inside connect_mqttServer() function. Once connection with broker is established, subscription to topic ‘rpi/broadcast’ is added. If connection is not established, the LED will blink three times to indicate failure of the attempt. While copying the code for another ESP32, always ensure that the name of client should be unique.
void connect_mqttServer() {
  // Loop until we're reconnected
  while (!client.connected()) {

        //first check if connected to wifi
        if(WiFi.status() != WL_CONNECTED){
          //if not connected, then first connect to wifi
          setup_wifi();
        }

        //now attemt to connect to MQTT server
        Serial.print("Attempting MQTT connection...");
        // Attempt to connect
        if (client.connect("ESP32_client1")) { // Change the name of client here if multiple ESP32 are connected. This should be a unique name.
          //attempt successful
          Serial.println("connected");
          // Subscribe to topics here
          client.subscribe("rpi/broadcast");
          //client.subscribe("rpi/xyz"); //subscribe more topics here

        }
        else {
          //attempt not successful
          Serial.print("failed, rc=");
          Serial.print(client.state());
          Serial.println(" trying again in 2 seconds");

          blink_led(3,200); //blink LED three times (200ms on duration) to show that MQTT server connection attempt failed
          // Wait 2 seconds before retrying
          delay(2000);
        }
  }

}
This function will be executed only if messages are available on subscribed topics. You have to write extra code inside this function to filter the messages from a specific topic. As an example, I have demonstrated how to check the messages arriving on topic ‘rpi/broadcast’ and take action based on the message. Here, I am just blinking the default LED for a longer duration when the incoming message is ’10’. You can customise it as per your requirement.
void callback(char* topic, byte* message, unsigned int length) {
  Serial.print("Message arrived on topic: ");
  Serial.print(topic);
  Serial.print(". Message: ");
  String messageTemp;

  for (int i = 0; i < length; i++) {
    Serial.print((char)message[i]);
    messageTemp += (char)message[i];
  }
  Serial.println();

  // Check if a message is received on the topic "rpi/broadcast"
  if (String(topic) == "rpi/broadcast") {
      if(messageTemp == "10"){
        Serial.println("Action: blink LED");
        blink_led(1,1250); //blink LED once (for 1250ms ON time)
      }
  }

  //Similarly add more if statements to check for other subscribed topics
}
The Output
Its time to run all the clients together and see the result of our work. Open the terminal on Raspberry Pi and run the two scripts. You should see the result shown in picture below. Notice that ‘client_sub.py’ receives data from all three topics. All devices work in tandem, as programmed, to share the data among each other.

If any of your ESP32 is powered up through USB of your PC installed with Arduino IDE, then you can see the following messages on Serial Terminal (tool provided by Arduino IDE).
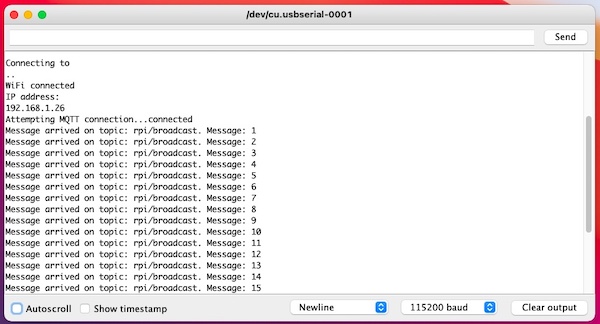
The IP address of your device could be different from the IP address shown in the result above. Here you can observe that the ESP32 is receiving the data on topic “rpi/broadcast”. So, this should be enough to spark your creativity to experiment further and use these devices for your next IOT project.
Possible Applications
The article provides a foundation for setting up a MQTT network and establish seamless flow of data between various devices. You can now extend the ESP code to gather real world data through any sensor and log it centrally at Raspberry Pi. You can also make use of the built in Node-Red application in Raspberry Pi to generate visually appealing dashboards to display the data collected from various sensors. Possibilities are endless and are limited only to your imagination. Let me know what you create using this technique in the comments below.
Hey, thanks a lot for your article! Your Video as well was awesome! It will help me massively with my current project :). One question: The Broker can of couse be an ESP32 coded in Arduino IDE as well, can’t it? Kind regards, Luke
I have come across articles where ESP32 is used as an MQTT client to connect to an MQTT broker and publish/subscribe to topics. May be it does not have the necessary infrastructure or capabilities to act as a standalone MQTT broker. Let me know if you find anything otherwise.