Representational State Transfer API or Rest-API is a popular way of exchanging data over internet and extremely useful in creating applications for IOT projects. It is a way of requesting a service from a Web resource (usually a Web Application running in a Webserver). The Web resource performs the action based on the request and responds back to the client with desired information in a particular format. The format in which data is exchanged is usually JSON and the communication protocol is HTTP.
The client requesting the service can be a code running in your browser or a code running in a hardware such as Raspberry Pi, ESP 32 or any other microcontroller which can connect to internet.
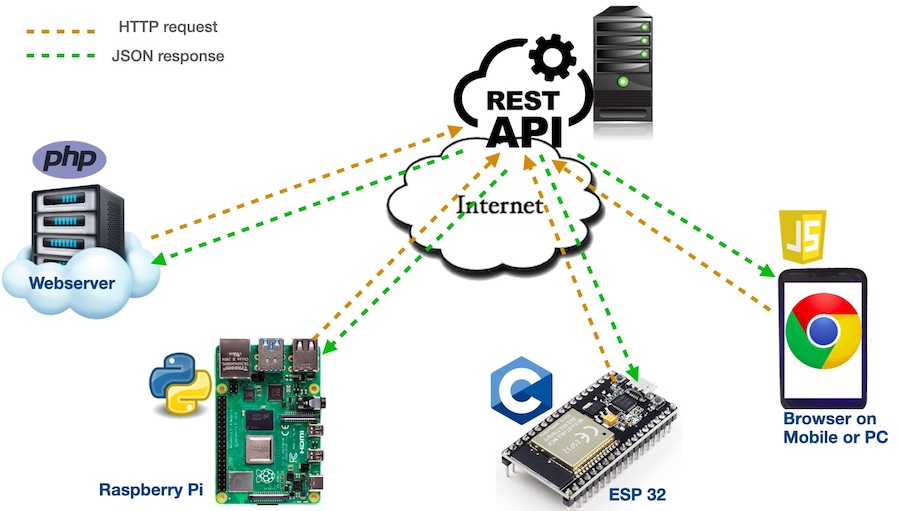
This article describes the working of Rest-API with example codes in various programming languages. Examples include Python (running on Raspberry Pi), C (running on ESP32), PHP (running on Webserver) and Javascript (running on browser). The sample codes can be downloaded from Github. These sample code snippets can be building blocks for your next IOT project with Rest-APIs. You can use your choice of hardware & programming language to create your project.
For example, the Online Web Remote application hosted on this server works with this technique to control the GPIOs of your Raspberry Pi over internet. Both, the web application (web remote) and your Raspberry Pi make use of a Rest-API in the server to give you an out of the box service. Try it, its fun. You can access your web remote by creating an account and logging in.
How Rest-API works
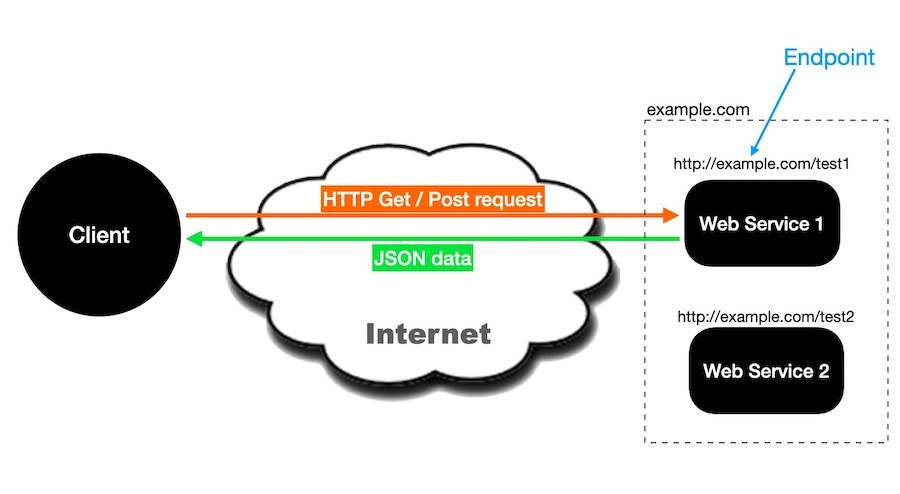
The web resource with Rest-API interface exposes one or more end points for clients. These end points are nothing but regular URLs through which the API can accept an incoming HTTP request via GET or POST methods. When a client makes a request to an end point, the web resource performs the required background computation and generates an output in JSON format. This JSON data is communicated back to the client. Now it is client’s responsibility to process the JSON data and make use of it.
There is an advantage of using standardised JSON format because all modern programming languages have built-in support / libraries to parse JSON data. Further, all modern Single Board Computers and microcontrollers have built-in wired or wireless ethernet connectivity and generating HTTP requests.
As long as your device can connect to internet, generate a http request and process JSON response, you can work with Rest-APIs. All modern programming languages have built-in support or libraries for this task.
These factors make Rest-APIs a popular choice for creating IOT projects with embedded devices.
Example of Rest-API
The sample Rest-API created for the purpose of demonstration is very simple and written in php as shown below.
$arr['1']['temp'] = random_int(0, 100); //a random value
$arr['1']['hum'] = random_int(101, 200); //a random value
$arr['1']['pres'] = random_int(201, 300); //a random value

$arr['2']['aa'] = random_int(301, 400); //a random value
$arr['2']['bb'] = random_int(401, 500); //a random value
$arr['2']['cc'] = random_int(501, 600); //a random value

$json=json_encode($arr); //convert the array in json format
echo"$json"; //send the json response
The PHP script simply creates a 2-d array with random values and encodes the array in JSON format before sending it back to the client as response. The JSON response is shown below. The numeric values change randomly in every response.
{"1":{"temp":51,"hum":154,"pres":221},"2":{"aa":359,"bb":426,"cc":521}}This example Rest-API is also uploaded on this (helloworld) server, You can see the response of the API on your browser using this link: https://helloworld.co.in/demo/rest-api/data.php
Access Rest-API with Raspberry Pi
Raspberry Pi can connect to internet using built-in wifi and access a URL via Terminal command or Python code. The sample Python code for accessing our example Rest-API is described below. The code begins with importing libraries. The ‘os’ library is used to execute a shell command and ‘json’ library is used to decode and parse the JSON data.
import os, jsonYou can run the API in local webserver in you LAN or access the same API on the helloworld server. Depending upon where the API is, you can specify the URL.
url="https://helloworld.co.in/demo/rest-api/data.php"
#url="http://192.168.1.3/demo/rest-api/data.php"
CURL command can be used to access a URL programatically. Here, we prepare the command for generating HTTP request.
''' curl is used to make a http request '''
cmd="curl -s -k " + url
print (cmd)
Now, inside the ‘try’ block, we execute the command and make the HTTP request. The JSON response is stored in variable ‘result.
try:
	'''Make the web request and store the json data obtained from web resource in a variable  '''
	result=os.popen(cmd).read()
	print (result)
The raw JSON data is parsed using json.loads() function and output is stored in variable ‘arr’.
	'''parse the json data'''
	arr=json.loads(result)
Now, we can access the desired information as if it is a 2-d list. You can now use this information for your purpose.
'''access the elements and use in the code'''
temp = arr["1"]["temp"]
hum = arr["1"]["hum"]
pres = arr["1"]["pres"]
print("n")
print("Temperature:",temp)
print("Humidity:", hum)
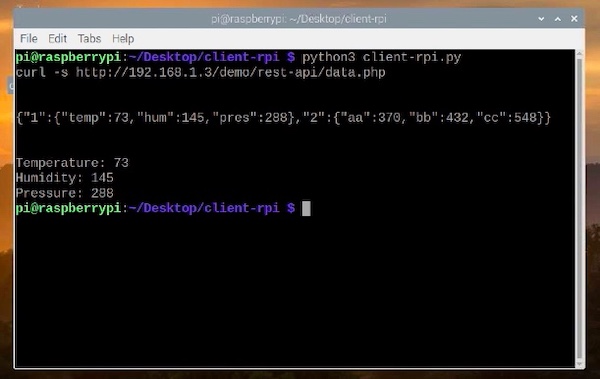
print("Pressure:",pres)The output of the program on Terminal is shown below.
Access Rest-API with ESP 32
ESP32 is a low cost yet versatile microcontroller which comes with built-in wifi. It can be programmed in C language using Arduino IDE. The code begins with including necessary libraries and defining variables. In order to generate a HTTP request, ESP32 should emulate as HTTP client. This functionality is provided by ‘HTTPClient.h’ library. To parse the JSON data, I have used ‘ArduinoJson.h’ library by Benolt Blanchon. You can download it from here.
#include "WiFi.h"
#include "HTTPClient.h"
#include "ArduinoJson.h"

const char* ssid = "yourSSID";
const char* password = "yourPassword";

String server = "https://helloworld.co.in/demo/rest-api/data.php";
//String server = "http://192.168.1.3/demo/rest-api/data.php";

#define builtIn_Led 2

DynamicJsonDocument doc(1024); //object to store the JSON data
The execution begins with setup() function followed by loop() function. The setup_wifi() function takes care of connecting ESP32 with wifi router.
void setup() {
  Serial.begin(115200);
  pinMode(builtIn_Led, OUTPUT);

  setup_wifi();
}
The loop function simply calls the fetch_data() function at a regular interval of 15 seconds, which is the heart of this code.
void loop() {
  // 15 seconds delay
  for (int i = 0; i < 15; i++) {
    delay(1000);
    Serial.print("-");
  }

  fetch_data();
}
You can refer the complete code provided on Github. The key aspects of the fetch_data() function are described here. We create a ‘HTTPClient’ object and use it to make a GET request to Rest-API’s URL. If the URL is valid and reachable, you will receive a ‘200’ response code. It means that everything is OK.
HTTPClient http;

http.begin(server.c_str());
int httpResponseCode = http.GET(); // Send HTTP GET request
Now, we go ahead and collect the JSON response
String result = http.getString(); //this variable stores the json data returned by the serverThis response is parsed and converted into an array using following commands.
deserializeJson(doc, result);
JsonObject obj = doc.as();
Now, we can access the information in array and use it for our purpose.
int temp = obj["1"]["temp"];
int hum = obj["1"]["hum"];
int pres = obj["1"]["pres"];
Serial.print("nTemperature: ");Serial.println(temp);
Serial.print("Humidity: ");Serial.println(hum);
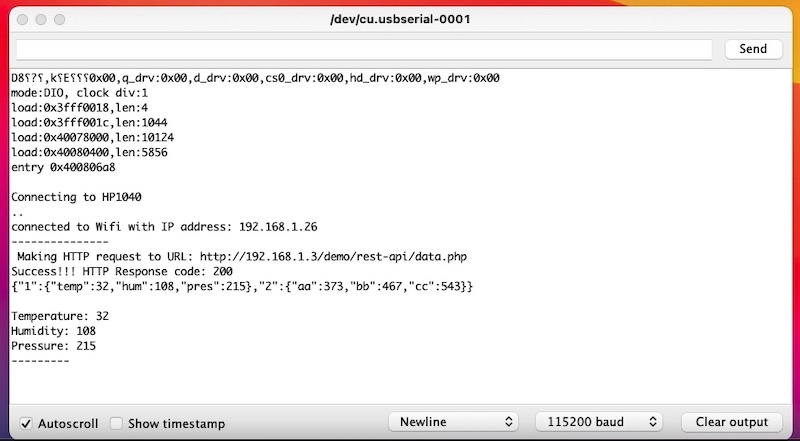
Serial.print("Pressure: ");Serial.println(pres);If you power up the ESP32 via usb port of a PC or Laptop with Arduino IDE, you can see the output of the program on Serial Monitor. A snapshot of the same is shown below.
Access Rest-API with Web Application (PHP Code)
Most common way to access a URL is through a browser. Using a browser in a Phone or laptop, we can directly access the URL of Rest API and see the response. This is just a passive way of looking at the API response. However, in order to use and process the JSON response in a web application, we need to grab this data programatically via php or JS code. The PHP code is required to be placed in public directory of a Webserver. You can place the PHP code in the same server from where the Rest-API is operating. OR you can place this code in any other server on the internet from where the Rest-API is reachable.
The code begins with specifying the URL of the API.
$url = "https://helloworld.co.in/demo/rest-api/data.php";
//$url = "http://192.168.1.3/demo/rest-api/data.php";
Fetching the data from the remote URL and storing it in a variable. The data here is JSON response of the Rest-API.
$data=file_get_contents($url);PHP has built-in functionality of decoding and parsing JSON data. The JSON data is converted into an array by following command.
$obj = json_decode($data, true); Now, we can simply access the array elements and use the desired information.
$temperature=$obj['1']['temp'];
$humidity=$obj['1']['hum'];
$pressure=$obj['1']['pres'];

echo"Temperature: $temperature
	 Humidity: $humidity
	 Pressure: $pressure";
The PHP script is hosted on this server and accessible from this link: https://helloworld.co.in/demo/client-php
You should see following page on your browser.
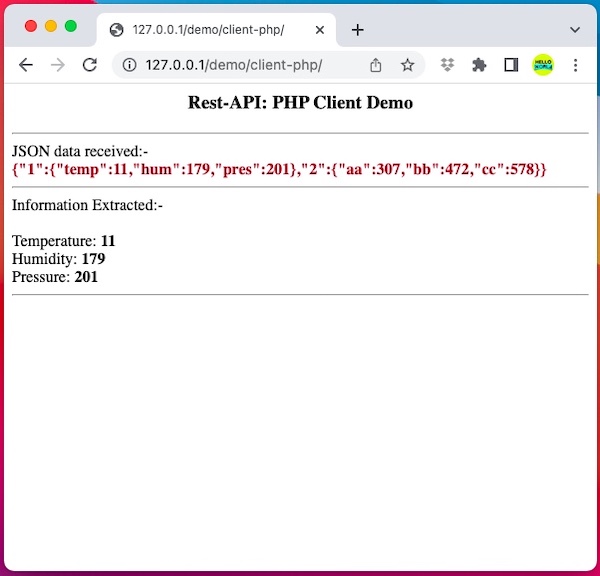
Basically, the PHP code running in the server is responsible for:-
– Obtaining the JSON data from a remote Rest-API.
– Extracting the desired information.
– Generating the HTML code with information, so that it can be displayed on the browser.
Access Rest-API with Web Application (Javascript Code)
While working with Javascript, you need to understand that the JS code is embedded in a HTML file. This HTML file is hosted on a server. When you request the HTML file via browser, the Javascript code is shipped to your browser along with the HTML code. Now, the Javascript code runs on the client’s browser. This JS code is capable of generating HTTP calls and requesting data from a server. This task can be done in background using a technique called ‘AJAX’. The important point to note is, this JS code can only make HTTP calls to the server from where it originated. This is due to the same origin policy followed on the internet. That means the JS code created for this project is required to be in the same server where the Rest-API is placed. With this understanding, lets see the JS code.
jQuery library is used in the code to perform AJAX calls.
The data_request_timer() function creates a timer object, which is responsible for running the get_data() function every 5 seconds to get data from the Rest-API.
function data_request_timer(){
		window.setInterval(get_data, 5000); //timer for running get_data() function every 5 seconds
	}
The function is called once while loading the body of the page.
Inside the get_data() function, we specify the path of the Rest-API
var url="https://helloworld.co.in/demo/rest-api/data.php";
//var url ="http://192.168.1.3/demo/rest-api/data.php";
The jquery function $.get() takes the URL as parameter and makes a call to the URL in background. The response of the URL is available in variable ‘data’ which is parsed and converted into an array. The desired information is accessed from array and shown on relevant HTML elements.
$.get(url,
function(data, status){
document.getElementById("data").innerHTML = data; //this is the JSON data received from Rest-API
var str=document.getElementById("data").innerHTML;
console.log("str: " + str);
const obj = JSON.parse(str); // The JSON is parsed and converted into an array
//access the information from array
var tempr = obj['1']['temp'];
var humid = obj['1']['hum'];
var press = obj['1']['pres'];
// Display the information on HTML elements
document.getElementById("temperature").innerHTML = tempr;
document.getElementById("humidity").innerHTML = humid;
document.getElementById("pressure").innerHTML = press;
}
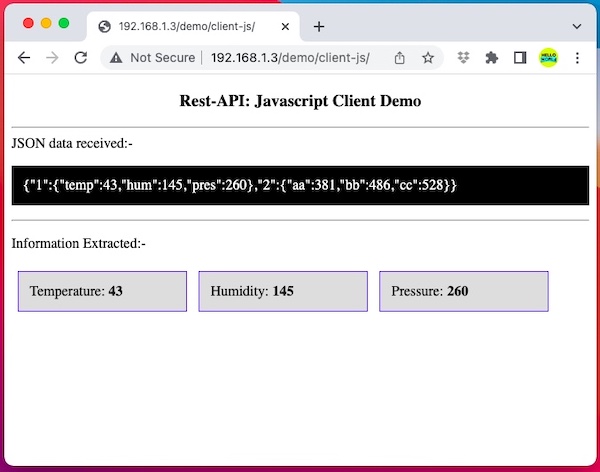
);The HTML file with this JS code is hosted on this server. You can access the same from this link: https://helloworld.co.in/demo/client-js
You should see the following page.
Conclusion
I hope you have got the idea behind Rest-APIs. Also, you would have appreciated the simplicity and power of this technique. Rest APIs are all over the Internet and serving all sorts of devices. Go ahead and pick your favourite device & programming language to create your Rest-API application. Let me know in the comments below.