Water tank online widget
In the Smart Water tank project, we learned how to create a Web Application to process the real time data from a remote sensor and created a web dashboard. The project required setting up your own webserver and creating a web page. That means you are expected to know a bit of web development. What if you are not comfortable with web development and still want to integrate your sensor & Raspberry Pi with a web page. Well, then this article is for you.
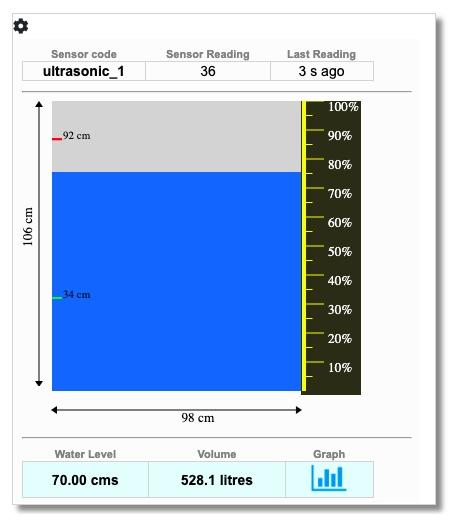
I have created an online Water Tank widget that you can configure to use with your Raspberry pi
The application is hosted on the same server that is serving you this page. In this project you are going to:-
1. Get access to your widget
2. Configure it as per the dimensions of your tank
3. Prepare the Raspberry Pi to send data to your widget
4. Connect the Ultrasonic Sensor to Raspberry Pi and Visualise real time data
5. Automate the data upload process through CRON
6. Create multiple widgets for multiple tanks
Access your Widget
You can gain access to your online water tank widget by Loging in. If you don’t have an account you can create one. When you create an account, an authentication token (auth_token) is emailed to you. The token is 32 byte long alphanumeric string as shown in the example below.
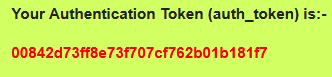
Open your email and copy the token. You will require this token to communicate with your online widget.
Configure the widget
Click on the settings button (gear icon) visible on the top left of your widget. You will see a simple form, that requires you to enter the Height & Diameter of your Tank. Enter these dimensions in centimeters.
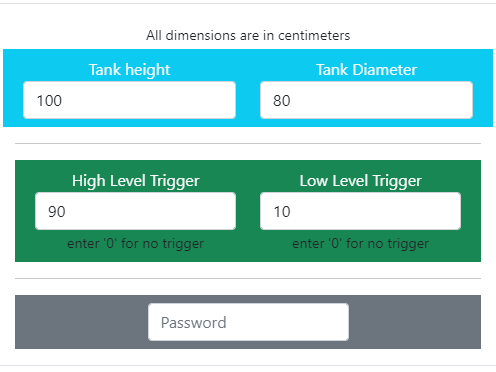
High & Low level triggers settings are meant for your Raspberry Pi to take some action when the water level is above High Trigger value and below the Low Trigger value. Once you fill out the form and save, these settings are reflected on your widget as shown in the example below.
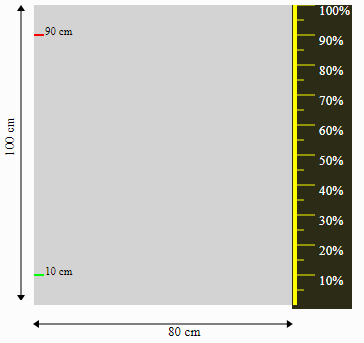
The settings of your widget (height, diameter & Trigger values) are received by your IOT Board (Raspberry Pi) automatically and can be used by the Python code running on it to take necessary action and turn ON/OFF any physical device.
Your Widget is now all set to receive data from your Raspberry Pi. Go ahead and prepare your Raspberry Pi to send data to this widget.
Prepare IOT Board (Raspberry Pi)
Download the code on your Raspberry Pi.
You can download the code from this Github link. The code folder contains a python file named ‘helloworld.py’. This file is responsible for all the communication with your online widget.
In order to use this file, you need to paste your the auth_token in it as shown in the picture below.

This ‘helloworld.py’ file is imported in other python files where lies the actual implementation. Consider ‘helloworld.py’ as an API that does the job of sending data back and forth between your IOT board and your online widget. You need not modify / add / delete the code in it. Just paste your auth_token in it.
Check Communication between your Raspberry Pi and Online Widget
Now, lets test the communication by running a sample script ‘sample.py’ on Raspberry Pi. This sample script simply generates a random value and sends it to your online widget. When this data is received at server, your widget will display the water level corresponding to the value.
Open terminal on Raspberry Pi and change directory to the code folder. Run the script using command ‘python sample.py’ as shown below.
When you run the ‘sample.py’ file for the first time, data gets uploaded and the online widget responds with json data w.r.t the settings you made while configuring the widget. These settings are saved on your Raspberry Pi in a file named ‘settings.json’ inside ‘util’ folder.
Next time onwards when you run the ‘sample.py’ file, the widget simply sends ‘success’ acknowlegement with data value received by it.
Now, whenever you make any changes in the Widget’s Dimensions or Trigger values through Web Browser, the ‘settings.json’ file gets automatically updated on your device during the next upload cycle.
Just remember that you can upload data only value after an interval of one minute. If you try to run the script before this duration, the server will throw an error message. The error messages are logged in a text file inside ‘util’ folder.
Connect the Ultrasonic Sensor to Raspberry Pi
Lets upload the actual Sensor Data to Online Widget. Now, you need to interface your Ultrasonic Sensor with Raspberry Pi and run the script ‘sensor.py’.
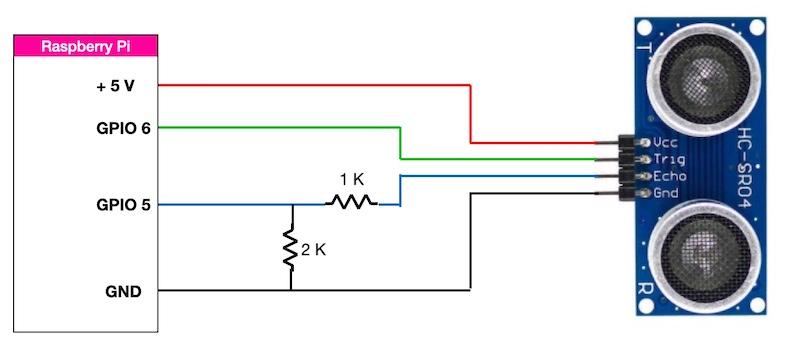
The script ‘sensor.py’ measures the distance using Ultrasonic sensor and uploads the reading to your online widget. It also, takes action to turns ON /OFF the designated GPIO pins based on the current water level. To do so, it simply reads the ‘settings.json’ file available locally and fetches the settings of your online widget.
You can modify the action logic based on your requirement.
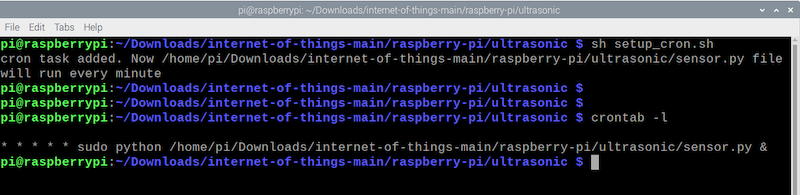
Setup a cron task to automatically upload Sensor data
The script ‘sensor.py’ needs to run every one minute to keep uploading the sensor data. One simple way to automatically run this script is through cron task.
If you are already familier with cron tasks, then you you can create it yourself by using ‘crontab -e’ command. Otherwise just run the bash script ‘setup_cron.sh’ present in the folder. The bash script will create a cron task that will run ‘sensor.py’ file every one minute. You can see the see the corn task entry by using the command ‘crontab -l’
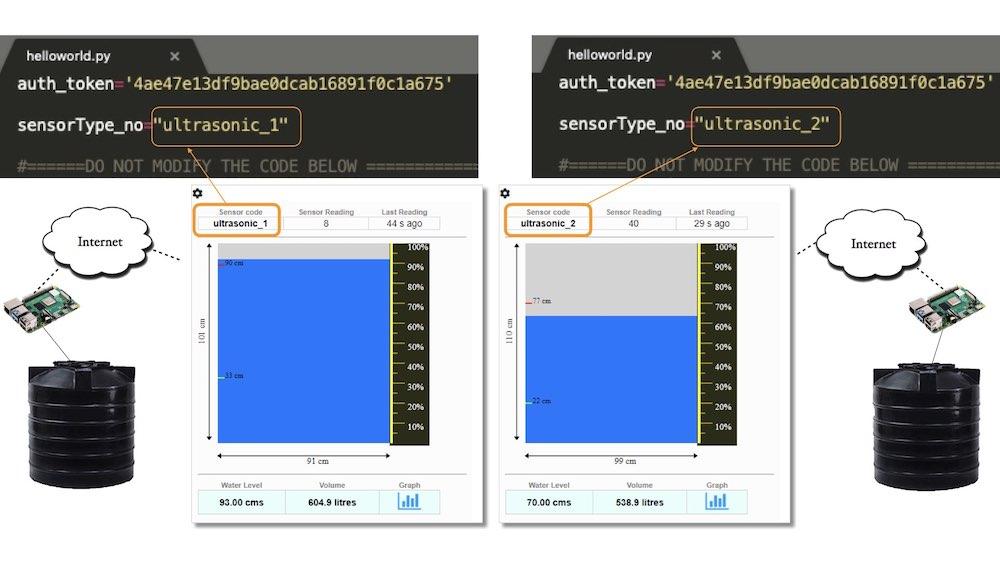
Create Multiple Widgets
You can add multiple widgets and monitor them on a single web page. Remember, each widget accepts data from its respective Raspberry Pi. So if you have 2 or more Raspberry Pi, you can configure 2 or more widgets to receive data from them. Just ensure that the ‘sensorType_no’ in the code matches the ‘Sensor code’ displayed on the widget as shown in example below.
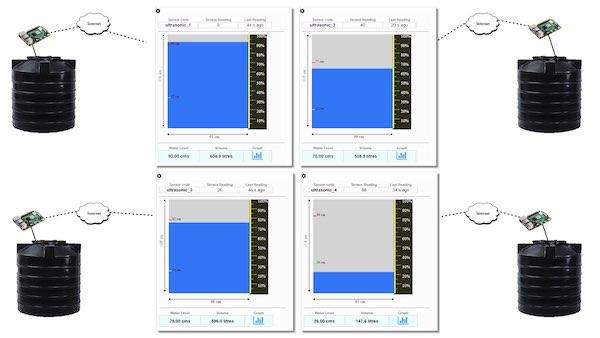
Similarly, you can configure upto 4 widgets in this manner. So if you happen to have water tanks in USA, Germany, Australia and India. You can monitor them all simultaneously on a single web page.
Conclusion
It is a simple experiment to learn how an embedded device such as Raspberry Pi can interact with a remote Web Application. You just need to create an account to access your online widget. These widgets are available as service to you. You don’t have to know Web programming to use them. So go ahead and experiment with this online tool.
Julio Marcos